Spectrum Mill Basics
Table of Contents
Introduction
Mass spectrometry has become a core technology for proteomics
research, but without modern tools, there are often bottlenecks in data
interpretation and review. The Agilent Spectrum Mill MS Proteomics
Workbench is a comprehensive suite of software tools designed to
facilitate high-throughput proteomics experiments using mass
spectrometry. Key features of the Spectrum Mill include:
Intelligent spectral extraction
The Spectrum Mill data extractors preprocess data to extract
high-quality spectra for database searches. Data extractors identify
and exclude noise spectra and poor quality spectra, to increase the
speed of database searches and to reduce the number of false positives.
The data extractors for raw data files preprocess MS/MS spectra from Agilent
and Thermo Fisher Scientific instruments. MS-only spectra can be searched using
peak list files or by pasting a mass list into the Manual PMF form. These
extractors produce files that contain mass - intensity lists suitable
for use with Spectrum Mill search programs.
An optional Spectrum Mill Data Extractor for Generic Peak List Files
enables use of the Spectrum Mill with peak list files,
such as those as exported from Micromass Q-Tof using the ProteinLynx
package. This extractor handles individual *.pkl and *.dta spectral
files, or appended *.pkl files that contain multiple spectra. It also
processes *.mgf files. The Spectrum Mill Generic Data Extractor
prepares the peak list files for further Spectrum Mill processing.
Multiple search options
The Spectrum Mill provides multiple options for protein
identification and characterization. You can search MS/MS spectra using
MS/MS Search, or MS-only spectra using Manual Peptide Mass Fingerprinting
(PMF) Search. Both searches include optimized scoring schemes
that speed downstream data review.
MS/MS Search automates the search of large volumes of processed
MS/MS spectra against protein databases. The MS/MS Search
algorithm uses intelligent parallelization to provide extremely fast
searches. It can operate in identity mode to find unmodified peptides
or in variable modifications or homology modes to look for mutations,
post-translational modifications, and chemical modifications.
Manual PMF Search performs searches of spectral peak lists that you enter
into the Manual PMF Search form.
Automatic and manual match validation for MS/MS Search results
The Spectrum Mill offers both automatic and manual match
validation of MS/MS Search results. Autovalidation quickly segregates
those spectra that have matched well in the database search. Manual
validation (in Protein/Peptide Summary) provides tools for fast, easy
interactive data review and validation.
The Spectrum Mill segregates validated and unvalidated
matches, and keeps a cumulative history of validated results. Spectra
from remaining unvalidated matches can be re-searched using alternate
parameters or databases. Each iterative search involves fewer and fewer
spectra, making the searches even faster.
Fast, comprehensive result summaries
The Protein/Peptide Summary capability within the Spectrum Mill
workbench allows you to summarize and correlate search results for
MS/MS data. Protein/Peptide Summary includes tools to review entire
directories of search results, and summaries can range from single
samples to complex studies. The wide choice of summary modes makes the
results accessible to biologists and biochemists, as well as mass
spectrometrists.
Protein/Peptide Summary provides both qualitative and quantitative
information. Qualitative results (validated search matches) are
accompanied by either approximate quantitation (based on mean peak
intensities of component peptides) or quantitation based on stable
isotope or similar studies.
Advanced de novo spectral interpretation
For proteins not identified by database searching, the Spectrum Mill
workbench also offers advanced de novo sequencing based on the
Sherenga algorithm. The algorithm uses graph theory to generate a
list of potential peptide sequences and to discard unrealistic
solutions.
Workflow automation
The Spectrum Mill
allows you to automate a typical data analysis workflow for MS/MS data
files from protein digests:
- Spectral extraction
- MS/MS Search
- Autovalidation
- Quality Metrics
- Protein/Peptide Summary
- Archive Data
File system
Before running MS/MS Search or PMF Search with the Spectrum Mill
workbench, the spectral files must be placed in the appropriate
directory underneath the web root on the server running the Spectrum
Mill workbench. Because of communication demands for computer / mass
spectrometer during spectral acquisition, this is expected to be a
separate computer from the one that controls the instrument, with file
transfer occurring over a network.
Location of Spectral Files
After you configure your file system with data root directories, you
can create directories to place spectra as shown below:
Directory structure
- msdataSM
- blankDirectory
- mySampleDirectory
- myAgilentDirectory.d (place Agilent *.d
files at this level)
- myLCQfile.raw or myLTQfile.raw (place
Thermo Fisher Scientific *.raw files at this level)
- myQTOFmultiFile.pkl (place Micromass
appended *.pkl files, i.e. each file contains multiple spectra, at this
level)
- cpick_in
- spectrum1.dta (Place *.dta files exported from
Micromass Q-Tof instruments at this level)
- spectrum1.0047.8.2.pkl (Place *.pkl files
representing individual spectra exported from Micromass Q-Tof
instruments at this level)
- fit_batch_in
- spectrum1.2mi (Place files exported from Applied
Biosystems MALDI instruments at this level)
Note that you may have up to ten directory levels between msdataSM
and mySampleDirectory. But we recommend shorter path lengths to reduce
memory usage, especially for large data sets.
How Spectrum Mill locates data files
The Spectrum Mill recognizes the bottom of the directory
hierarchy (the location of data files) when it finds one of the
following:
- A file with a recognized raw data file suffix
- * .pkl file
- One of the following folders: cpick_in, fit_batch_in (containing
peak list file)
To ensure that the Spectrum Mill finds all your data files:
- Do not copy a processed data folder into a higher level folder.
- Keep your data files in subfolders that are at equivalent levels
in the Spectrum Mill file system. Remember that the Spectrum Mill
workbench can find only the highest level of data files in a given
subfolder. For example, given these two data files,
- E:\SpectrumMill\msdataSM\study1\mydir\datafile1.d
- E:\SpectrumMill\msdataSM\study1\datafile2.d
The Spectrum Mill will recognize datafile2.d, but not
datafile1.d.
Naming of files and folders
Do not use spaces and parentheses in folder or file names. The
following characters are also not permitted: | , ; % < > ? . +.
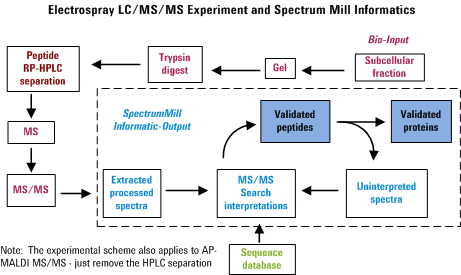
Overview for MS/MS Interactive Processing
In an automated LC-MS/MS experiment, one can separate peptides by
reversed-phase HPLC and acquire an MS/MS spectrum approximately every
second on whatever happens to be eluting from the column at that
particular instance. Hence in about a half hour, one can be awash in
about 1000 spectra. The Spectrum Mill provides tools to
extract information from that morass of data in a manner that attempts
to minimize the amount of data overload frustration. The figure below
was created to illustrate the overall process. Note that failure to
perform any of the items properly is likely to diminish the usefulness
of the final output.
Getting Started for Agilent Q-TOF and Other MS/MS Data
- Acquire some mass spectra.
- Export spectral files.
- For Agilent Q-TOF or ion trap data; transfer *.d files to the
Spectrum Mill computer in a data directory within the Spectrum Mill file system.
- For Thermo Fisher Scientific LCQ or LTQ data; transfer *.raw
files to the Spectrum Mill computer in a data directory within the Spectrum Mill file system.
- For Micromass Q-Tof data; use the Masslynx data system to
export *.pkl files, then transfer the files to the Spectrum Mill
computer in a cpick_in data directory within the Spectrum Mill file system (if
individual *.pkl files for each spectrum) or up one directory level if
appended *.pkl files.
- From the Spectrum Mill homepage, go to the Data Extractor page.
Preprocess the spectral files. The Data Extractor program recognizes
the data type and automatically uses the correct extractor:
- From the Spectrum Mill homepage, go to the
MS/MS Search page.
- Set the appropriate MS/MS Search parameters
and run the searches.
- Validate results in the Autovalidation page
or manually in the Protein/Peptide Summary page.
- Review the data from the Protein/Peptide Summary page.
For more details on the MS/MS Search page,
see the MS/MS Search Help.
Spectral Preprocessing for MS/MS Data
Data Extractor
The Spectrum Mill Data Extractor preprocesses raw data files from
Agilent and Thermo Fisher Scientific instruments, to extract high-quality spectra for
database searches. The Data Extractor automatically detects which type
of raw file (specific instrument vendor or generic format) you have submitted and then invokes the appropriate
extraction program (provided that it has been purchased and installed
on your server). The MS/MS raw file data extractors extract and merge
nearby MS/MS spectra from the same precursor ion. They optionally
apply MS/MS similarity criteria prior to merging scans, to avoid
merging closely eluting or co-eluting isobaric peptides. For Agilent
*.d ion trap and Thermo Fisher Scientific *.raw ion trap data, the
extractors optionally merge MS2 and MS3 scans
from the same precursor. The extractors assign precursor charges where
possible, centroid the MS/MS spectra, calculate spectral features,
filter MS/MS spectra by quality, extract reporter ion
intensities (iTRAQ and TMT), and calculate extracted ion
chromatograms (EICs) for the intervening MS precursor scans. The intensities are later
are used for quantitation by subsequent Spectrum Mill programs.
Note: As of Spectrum Mill B.05.00, XtractorFinnigan
uses the Thermo (Xcalibur or MSFileReader) code rather than Spectrum Mill code
to do
centroiding. Xcalibur or MSFileReader centroiding does a
better job of using appropriately narrow windows across the entire mass range
(particularly important for the barely resolved TMT-10 peaks). It also
requires half the extraction time. Because the intensities are scaled
differently (10-100-fold), you should not mix Spectrum Mill centroiding
and Xcalibur centroiding across multiple directories that will later be used
for a combined report.
The functionality has been split into multiple programs:
- XtractorAgilent invoked for Agilent Q-TOF *.d data
directories
- XtractorAgilentTrap invoked for Agilent ion trap *.d data
directories that contain a .yep file
- XtractorFinnigan invoked for *.raw files
In previous versions it required the Active-X component that is present
with the Thermo Fisher Scientific Xcalibur data system.
As of Spectrum Mill B.04.00, you no longer need Xcalibur, provided you
install the Thermo Scientific MSFileReader, which you can
download.
You must install the 64-bit version.
If you installed the MSFileReader after installing Spectrum Mill,
you need to copy the xtractorFinniganFR.cgi file
over the existing xtractorFinnigan.cgi file. (Both files are located in
\Spectrum Mill\millbin.)
- extractorGeneric invoked for generic *.pkl, *.mic, *.dta,
*.mgf files
For specifics on third-party software requirements, see the Installation
Guide you received with your software. In general, Agilent Q-TOF
and Agilent Trap (including ETD) do not require installation of offline
software. Thermo data (*.raw)
requires the offline software be installed on the server, and the
version must be equal to or later than the version that was used to
acquire the data.
Output from Data Extractor consists of three types of files.
- mzXML files containing all quality-filtered,
centroided individual MS/MSspectra for an LC-MS/MS run, for Agilent Q-TOF .d
and Thermo Fisher Scientific .raw data (Spectrum Mill B.04.01 and later).
With Spectrum Mill B.06, the Generic Extractor
extracts *.pkl files to mzXML as well. Spectra from other instruments are extracted to individual
*.pkl files.
- A summary file: SpecFeatures.1.tsv, containing spectral
characteristics such as Max. Sequence Tag length,
MS/MS reporter ion intensities, precursor ion intensity, retention time, and
chromatographic peak width from the MS/MS scans that are used in the MS/MS Search,
Quality Metrics, Sherenga de novo Sequencing, Protein/Peptide Summary, and Spectrum
Summary scripts.
- Log files that describe reasons for rejecting particular MS/MS
spectra and the means by which the precursor charge was determined.
If your input into the Spectrum Mill consists of peak list
files (for example, from Micromass Q-Tof), see also
Data Extractor for Generic (Peak List) Files.
Spectral Extraction
- Merge scans with same precursor m/z - Using the
user-designated time window and precursor m/z tolerance,
duplicate MS/MS scans are merged into a single spectrum.
- For scans with the same precursor m/z, the MS/MS scans
are compared to ensure that they correspond to the same peptide. You
can adjust settings in instrument.txt
to control the comparison and merging.
- For Agilent *.d ion trap and Thermo Fisher Scientific *.raw ion
trap data, the extractors optionally merge MS2 and MS3
scans from the same precursor.
- For Agilent data files that contain spectra that alternate
between CID and ETD, the software merges the ETD spectra the same way
as the corresponding CID spectra. For example, if the CID spectra were
merged from scan 2 thru 12, then the ETD spectra are merged from scan 3
thru 13. In no case are ETD spectra merged with CID spectra.
- For the Thermo Fisher Scientific LTQ Orbitrap and LTQ FT, the
software ignores the m/z tolerance for merging stated on the form and uses the
instrument tolerance instead. This is also now the case for Agilent Q-TOF
data.
- Peak Merging - When spectra are merged, many of the
corresponding peaks in the spectra will not have identical mass; hence
using a tolerance of +/- 0.25 Da (for ion trap data) the peaks are
merged by summing the intensity and retaining the mass of the most
intense peak (does not try to centroid). This attempts to correct
artifacts resulting from prior centroiding of the individual spectra.
Peak Detection
The Data Extractor performs the peak detection steps described below
prior to precursor charge assignment, spectral quality filtering,
and spectral feature calculation. However, the peak detection does not persist. The extracted files
(*.mzXML) retain all centroided peaks, and peak detection is repeated when necessary in MS/MS
Search, Spectrum Matcher, and Sherenga de novo Sequencing. Thus, the MS/MS spectrum viewer can
visualize interpretation results on the full spectrum, rather than just the processed peak list.
- Signal/Noise Calculation - a noise level is calculated
across an entire spectrum. In order to minimize the extent to which
signal contributes to the determination of the noise level, the
following approach is employed to calculate the mean noise level: Start
by considering all peaks below a default noise threshold (3% of base
peak in spectrum for MS scans, 3% of the third largest peak for MS/MS
spectra, allows for spectra dominated by a single fragment ion and it's
major isotope). If they represent > 90% of the peaks - MS
scans or 65% of the peaks - MS/MS scans, then calculate the noise mean
and standard deviation; if not, then double the noise threshold and try
again. The signal/noise calculation then becomes a standard RMS (root
mean square) calculation where the actual threshold in a particular
spectrum is determined by multiplying the user-supplied signal/noise
ratio by the standard deviation of the noise mean and offsetting from
zero by the noise mean.
- Strip Isotopes by Looking Left - uses a "look-left"
(towards lower m/z) approach to merge the intensities of peaks
in an isotope cluster into the left-most member of the cluster. A
cluster is defined as a set of peaks where the peak immediately to the
left of another peak is at least 0.5 the height of the peak to its
right. (0.5 is a hard-coded constant representing minimum relative
isotopic intensity). For high-resolution data such as that from
time-of-flight instruments, the charge of the fragment-ion would be
assigned from the isotope spacing as the isotope cluster is merged.
Note that Strip Isotopes by Looking Left is used only to
calculate spectral features; the isotope peaks remain in the extracted
spectral file (in the *.pkl *.mzXML file).
- Strip Precursor Minus Neutrals - for MS/MS spectra, peaks
are removed in a window below the precursor m/z value of width
(20 Da / precursor charge) with an additional allowance of 2.5 m/z
above the precursor m/z for precursor isotopes. Peaks are also
removed in a 1.5 m/z window about the m/z value of
(precursor m/z - 2H2O / precursor charge) as well as
all peaks above the mass of precursor MH+ - CO2.
For ETD spectra, this function also removes corresponding peaks for the charge-reduced forms of the
precursor ion.
- Filter By Max Num Intense Peaks (Max. # Peaks Retained) -
retains no more than the specified number of peaks having the greatest
intensity remaining after the above steps.
Spectral Features
A variety of spectral characteristics are pre-calculated for
possible later use in the MS/MS Search, Quality
Metrics, Sherenga de novo
Sequencing, Protein/Peptide Summary, and Spectrum Summary scripts. MaxSequenceTagLength
and totalIntensity are the most noteworthy. The following lists
the more important spectral features. The extractors calculate
additional features, depending on the amino acid modifications, etc.
The extractors store the spectral features in the file specFeatures.tsv,
with the variable names listed below. A subset of the
fields that are reported are listed here.
- precursorAveragineChiSquared 1 - Chi2 measure of the precursor ion
isotope cluster shape (combined from the two MS1 scans immediately before and after the MS2 scan) as compared to
the theoretical isotope cluster shape of averagine. (0.85 to 1.0 is good.)
- precursorIsolationPurityPercent -
intensity of the precursor ion
and its isotopes divided by the total peak intensity in the precursor isolation window used for the MS2 scan
(combined from the two MS1 scans immediately before and after the MS2 scan), <50%
indicates reporter quantitation was not used because of expected
contamination by co-fragmented peptides.
- precursorIsolationIntensity - denominator used in the precursorIsolationPurity metric
- ratioReporterIonToPrecursor - sum of the reporter ion intensities (iTRAQ_114+iTRAQ_115+iTRAQ_116+iTRAQ_117) divided by precursorIsolationIntensity
- chromatographicPeakWidthSec - width of precursor ion chromatographic peak, 0 indicates no more than one MS1 scan had a satisfactory precursor isotope cluster shape
- reporter ions - the abundance of each reporter ion for isobaric modifications (iTRAQ, TMT)
- retention time - the retention time for the MS1 precursor as determined by the EIC
- peak width - the peak width for the MS1 precursor as determined by the EIC and averagine cluster match over the retention time
- precursor ion purity - a measure of how "pure" the precursor isolation was when fragmented. Co-eluting isobaric peptides will result in a lower purity.
- maxSequenceTagLength - a powerful spectral quality metric
calculated after peak detection and fragmetn charge assignment that represents the length of the
longest continuous string of amino acids that can be created by
following a path from high mass to low mass that links peaks separated
by the mass of an amino acid; for low resolution MS/MS sspectra with a precursor charge > 1 this path
may be formed assuming the ions are either all singly charged or all doubly charged.
- maxSequenceTag - the string of amino acids found above.
Since this makes no allowance for fragment ion types this should NOT be
viewed as a de novo interpretation.
- totalIntensity - extracted ion chromatogram (EIC) of the
precursor ion, used for peptide quantitation. The EIC is calculated as
the sum of precursor m/z abundance in the MS scans ( ~
chromatographic peak area), and is dependent upon the user-designated
scan tolerance (chromatographic time in seconds), the putative
precursor m/z ( as adjusted by user designation of Find
precursor 12C ) and the user-designated mass tolerance for
merging scans with the same precursor m/z.
- For Agilent Q-TOF data, when
the charge state is determined (which is the typical cases with this
high-resolution data), the calculation of totalIntensity is
more accurate. The software sums the intensities of the monoisotopic
peak with all other peaks in the isotopic cluster. For this
calculation, it uses a +/-50 ppm window for each peak. With the
least-squares curve-fitting used to
determine the charge state for Agilent Q-TOF data, the masses of the
isotopic peaks are well-defined, so the software is able to exclude
interferences that occur within the m/z range of the isotopic
cluster.
- For Thermo Fisher Scientific Orbitrap data
with high resolution MS1 scans the
extracted ion chromatogram (XIC) of each precursor ion is calculated
in the intervening high-resolution MS1 scans of the LC-MS/MS runs using narrow
windows around each individual member of the isotope cluster. Peak boundaries
in both the time and m/z domains are dynamically determined based on MS scan
resolution, precursor charge and m/z, subject to Chi2 quality metrics on the
relative distribution of the peaks in the isotope cluster vs theoretical (averagine-based).
- For instruments that require the generic Data Extractor
(because of lack of software access to MS scan peak tables) this value
is instead the same as totalOriginalIntensity.
- For .pkl files from the Micromass Q-Tof , this value represents
the intensity from the precursor m/z from the single MS scan
preceding the MS/MS scan.
- totalOriginalIntensity - total intensity of all peaks in the MS/MS spectrum before peak detection
- noiseMean - the mean noise calculated as described in the Peak Detection section.
- noiseStandardDeviation - the mean noise standard deviation calculated as described in the Peak Detection section.
- parentSignalNoise- the precursor signal/noise ratio in the preceding MS scan calculated as described in the Peak Detection section.
- numPeaks - number of peaks remaining after peak detection.
- numOriginalPeaks - number of peaks before peak detection.
- selected_parent_m_over_z - unadjusted precursor m/z designated at acquisition time.
- parent_m_over_z - the final adjusted monoisotopic precursor m/z
- parent_m_over_z_centroid - the adjusted average precursor m/z
- parent_M_plus_H - MH+ calculated from the precursor_m_over_z and precursor_charge
- parent_charge - the assigned precursor charge.
- numScansAfterParent - number of scans taken between the MS scan and the particular MS/MS scan.
- maxIntensity - after peak detection, the intensity of the tallest peak in the MS/MS spectrum
- totalOriginalIntensity - after peak detection, the total intensity of all peaks in the MS/MS spectrum.
- MaxToTotalIntensityRatio - little used measure; maxIntensity/totalOriginalIntensity.
- BYpairs - the number of b/y pairs as described in the Precursor Charge Assignment.
- dissociation_method - the fragmentation mode, either collision-induced dissociation (CID) or electron transfer dissociation (ETD)
- phosphoProductIonsScore (PPIS) - Phosphopeptides, primarily Ser/Thr phosphopeptides, typically exhibit a strong neutral loss of
phosphate from the precursor ion during CID/HCD dissociation. This yields a characteristic ion of -98 m/z from the precursor ion. Presence of the ion
can be used to flag an MS/MS spectrum and craft a subset of spectra as candidates for faster searching with Phospho –STY variable mods enabled.
PPIS = 100 * phospho neutral loss ion Intensity / base peak intensity
Note: The PPIS is calculated when the SM Data Extractor is run. The values are stored in the file SpecFeatures.1.tsv.
Anticipate a future rev where PPIS becomes more like GPIS, and includes the p-Tyr 216 immonium ion. Additional phospho spectral features are calculated
and stored in the specFeatures file but have not yet been reduced to a filterable score. These include:
- numH3po4LossesZ1 # of 98Da spaced peak pairs
- h3po4LossesZ1fractionalIntensity S -98 intensities / S +98 intensities
- contaminantProductIonsScore (CPIS) - The name contaminant product ion score was intended in 2014 as a generic name that would evolve into a UI selection
for various sets of ions. As of June 2021 the only one implemented continues to be the hardcoded Glycosylation signature set (see GPIS).
- glycoProductIonsScore (GPIS) - Uses the 9 ion glycosylation-signature set: 126,138,144,168,186,204,274,292,366.
Numerically, GPIS is a 2-part score. The integer portion is simply a count of the signature ions observed in the MS/MS spectrum.
The right of the decimal portion is an intensity ratio metric : most abundant signature ion peak intensity / base peak intensity. The base peak is after
peak dection and removal of residual precursor and its water-loss. The max allowed value of the ratio is .99 when the signature ion is the base peak.
The design of the metric is intended to allow setting a particular threshold value that numerically enforces the dual concept threshold of: 1)
some, but not all of the
signature ions are present and that 2) at least one of them is quite intense. Thus a fixed threshold value of this metric > 4.5 is used in the
SM Quality Metrics module to calculate the metrics PSMs_Containing_Glyco_Product_Ions_num and All_spectra_Containing_Glyco_Product_Ions_num.
That same > 4.5 threshold is the default for GPIS spectral quality filtering in MS/MS search GPIS spectral feature filtering in Spectrum Summary.
Note: The GPIS is calculated when the SM Data Extractor is run. The values are stored in the file SpecFeatures.1.tsv in the column:
contaminantProductIonsScore for the historical reasons described above for CPIS. For greater clarity, when the values are later reported
asGPIS in Protein/Peptide Summary
and as GPIS in Spectrum Summary
the column header used for Excel export is glycoProductIonsScore.
- percentDissociatedIntensity - 100 * (total peak intensity in the in the MS/MS spectrum - intensity of residual precursor and its neutral losses of water and ammonia)
/ the total peak intensity in the in the MS/MS spectrum. For ETD and ETHCD spectra charge-reduced precursor related ions would also be subtracted.
MS/MS Spectral Quality Filtering
Although the Data Extractor filters out very poor quality spectra, certain spectral features
(see features described above)
can be used to craft a smaller subset of high quality spectra to limit input
to MS/MS search, Spectrum Matcher, and Spectrum Summary.
The same filters control the Identifiability Metrics calculated by Quality Metrics.
- Sequence tag length - longer tags are better. Lengths > 3 should be identifiable by
database search, and poor MS/MS with a tag length < 1 are usually removed by the Data Extractor.
- Precursor Ion Purity - 100% would be a perfect value; <50% indicates additional
peptides likely contribute to the MS/MS spectrum.
- Precursor isotope quality XIC's (Chi2 vs. Averagine) - a good shape is > 0.85;
< 0.5 is poor and suggests misassigned monoisotope, low abundance, or non-peptidic.
- Glyco Product Ions Score - a value > 4.5 is very likely to indicate the presence of a
glycopeptide bearing a HexNAc. Use this filter with MS/MS search to restrict a search to only glycopeptide spectra.
Also enable the OHexNAc (*-termS,*-termT) fixed modification, which triggers mass calculations
for a modified precursor ion paired with unmodified product ions, typical of the prompt neutral loss
of an OHexNAc moeity in CID and HCD spectra.
Multicore (Maximize CPUs) Data Extraction
Spectrum Mill B.05.00 now supports the ability to select Maximize
CPUs when you extract data. Prior revisions only supported Maximize
CPUs for MS/MS Search. Because
data extraction can require much more memory than searches, Spectrum Mill
implements a “memory governor” that prevents multiple extractions from
running at the same time if available free memory becomes too low. When all physical memory
is used, Windows will swap memory to disk, which significantly degrades performance. It is
better to limit the number of parallel extractions than to have Windows go into swap file
mode.
Configuring Service Request Manager Settings
The Spectrum Mill Service Request Manager (SRM) must be stopped for configuration changes to apply. See
To Start and Stop the Spectrum Mill Workflow Manager Service
for details. You must perform the following
procedures from an elevated command window (cmd.exe, Run As Administrator).The Spectrum
flow configuration file (millsrm\smsrm.config) provides several parameters that
configure how memory is governed:
<provider> section
<provider hostname="localhost"
available="true" maxConcurrentTasks="2" minRequiredTaskMemoryGb="2">
| maxConcurrentTasks |
This attribute is set by default during installation to be one less
than the number of (multicore) CPU cores detected. |
| minRequiredTaskMemoryGb |
This attribute defaults to 2 Gb. If there is less than that amount
available, no tasks that have been submitted to the workflow queue will be
allowed to run. When currently running tasks complete, memory will be freed
up and queued tasks will then run. |
<provider> <supportedTasks> section
The <task> definitions for “xtractorAgilent” and “xtractorFinnigan”
support multicore processing. These have “memFactor” attribute. Because it is not
possible to predict how much memory an extraction will require, the memFactor is
used to estimate it based on the data file size. For Agilent data, this factor
defaults to 1.25 times the size of the file. This factor applies to both
centroid and profile data. For Thermo .raw data, it is not possible for the
request manager to determine whether the data is profile or is centroid data.
The memFactor of 2.7 assumes data is centroid. If your lab typically generates
only profile data, the memFactor for the xtractorFinnigan task should be
set to 1.0 instead.
<task type="xtractorAgilent" memFactor="1.5" />
<task type="xtractorFinnigan" memFactor="2.7" />
When to Change the memFactor Settings
You use Windows Task Manager to monitor the memory usage when multiple
parallel extractions are occurring. You can also look at the Process tab to
monitor how many xtractorAgilent.cgi or xtractorFinnigan.cgi processes are
running at once.
If you find that available memory falls to near 0 or below, then consider
increasing the memFactor setting. This will reduce the number of parallel
extractions that can be run.
If you find that you do not see very many extractor processes running at the
same time, yet there appears to be enough available memory (for example 4 or
more Gb), then consider reducing the memFactor value. In general,Spectrum Mill
should allow the number of CPUs minus 1 to run in parallel (if no other searches
are running).
Note that reducing the MS/MS Search Batch Size setting can
also reduce the amount of memory used in searches.
When to Select "Maximize CPUs"
Select Maximize CPUs in the Data Extractor when you are only extracting a
data folder that contains multiple data files. However, if you are extracting
multiple data folders (where the number selected is near or greater than the
number of CPUs on the server) then you will generally get better performance if
you do not select Maximize CPUs for the Data Extractor. The data folders will
all be extracted in parallel.
To Use the Data Extractor Form
(MS/MS)
The following topics describe options available on the Data
Extractor form. In general, you should retain the default
settings, except for the options highlighted in red text on the
form. For more details, see Spectral
Preprocessing for MS/MS Data. Note that the options change
depending upon the vendor data type to be extracted.
Important note: If you wish to redo a data extraction,
mark the check box for Remove all prior results.
Extraction
- Extract - Click to place the task in the queue
for execution. The program will execute the task to extract spectra from raw data files
based on the time the command entered the queue, its capacity to
process tasks in parallel, and dependencies. Click this button after
you have either loaded a parameter file or manually set the parameters.
The name of the current parameter file appears in red at the top of the
form. Once you have saved a parameter file, you may start the
extraction from a workflow
rather than manually with the Extract button.
- Save As - Click to save current data
extraction settings in a parameter file.
- Load - Click to load a parameter
file that contains settings for data extraction. For default values, select a
parameter file from the Defaults folder.
- Remove all prior results - Mark this check box to remove
prior extractions, searches and data summaries for this dataset.
- Maximize CPUs - Mark this check box if you want this extraction
to take advantage of all available CPUs (as opposed to using only a single
CPU so that the other CPUs are available for other processes/users). If you
mark this check box for a workflow, the request queue will show two
requests -- the initial one to create the batch (of files) and the other to
show the progress and extractor results. Mark this check box only if your
data folder contains multiple data files, and if you have only selected a
few data folders to extract.
- Delete data files after extraction - If you are sure your extraction
settings are good, AND you have archived your data elsewhere, mark this check box to remove the data files
and save disk space. A placeholder file will be created so that you can
continue with other processing. If you need to re-extract, you will need to copy
the data files back to your Spectrum Mill server.
- Generate spectral features file only - Mark this check
box to generate the file SpecFeatures.#.tsv, without actually
generating the extracted spectra. This option appears when you
select a directory that contains peak list files but no raw data file.
When you have *.dta files, or *.pkl files that represent individual
spectra, you put your files in the cpick_in folder, and then
you must mark this check box. (When you have appended *.pkl
files, i.e. each file contains multiple spectra, then you put your file
in the root sample directory and you do not mark the check box.)
- Instrument: Select the instrument you used to
collect the data. This option appears only when you select a peak
list file rather than a raw data file.
Data Directories
Modifications
MS/MS Spectral Feature Filtering
- MH+ - Set the mass range of precursor
ions. Spectra with precursor ions outside of this range are
rejected.
- Scan time range: Set the range of scan times you wish to
extract from the raw data files. Use to this to avoid processing
regions of the chromatogram that are not of interest -- for example, the
beginnings and ends of runs. Keep the
default (1 to 300) to extract all scans.
- Disable quality filtering (sequence tag length = -1, no
merging, attempt to assign charge +1 only) - Mark this check box if
you wish to compare results with those from other database search
engines. CAUTION: Because this mode disables signal-to-noise and
spectral quality filtering, some of the spectra you submit for the
search will be poorer quality and you will generate significantly more
false positives! See Disable
quality filtering mode/disable match filtering modes. Note that the
check box for Disable quality filtering is available only if it
is configured in SMglobals.js. See the server administration
help for details.
- Sequence tag length - The minimum sequence tag length is
the length of the longest path of amino acids that is represented in
the spectrum. You use this parameter to reject extracted spectra
that are noisy or that do not represent peptides. For most
applications, it is best to retain the default of > 0 so you
are sure to extract all possible good spectra. You can set higher
thresholds for spectral quality later in the data processing. For
MALDI MS/MS spectra, set the value to -1 so that no filtering
is performed. See MS/MS Spectral Quality
Filtering.
- Ignore spectra with dissociation
mode: Mark check boxes for any spectra that you do not
wish to extract. Note that the software displays different dissociation modes depending on the type
of file you select.
Merge nearby MSn
scans with same precursor m/z:
Replicate MS/MS scans that were acquired nearby in time and have the same precursor m/z are merged into a
single spectrum using the constraints below.
- Retention time & m/z
tolerance: Set time and mass window for merging scans, and
for calculating chromatographic peak areas of precursor ions. See
Spectral Extraction.
- For Agilent Q-TOF data, keep the default mass window to +/- 1.4
m/z.
The software uses this value to merge scans, but generally does not
use the value to calculate chromatographic peak areas. When the
software can determine a charge state, it uses a more accurate method to
calculate the intensities. For those few spectra where it cannot
determine a charge state, the software does use the +/- 1.4 m/z
to calculate the intensities of the extracted ion chromatograms.
- For MALDI, change the time window from the default of 60 to 1000 (or the total run time in
seconds). Since MALDI is not chromatographic data, you want
all instances of the same precursor merged.
- For Thermo Fisher Scientific data the m/z tolerance on the form is used when MS1 scans were collected at low resolution
in an ion trap. If there are high-resolution MS1 scans collected in an Orbitrap, the software ignores the m/z tolerance
on the form and instead dynamically determines the m/z tolerance based on the MS1 resolution.
- If you are attempting differential expression quantitation, and
your labels differ in mass by only a few Da, see Quantitation for labels with small mass
differences.
- General MS/MS Merging Constraints: The MS/MS scans can be compared to ensure that they
correspond to the same peptide. For Agilent data you can adjust
settings in instrument.txt
to control the comparison and merging. For direct control, select
from the following list of options:
- No merging (tolerate
protein quantitation multi-counting) - For single proteins select
this option to improve coverage and detect more low-level peptides.
- Retention time &
precursor m/z tolerance only - Select to merge scans based only on
the values of the RT and precursor m/z tolerance entered above.
- Spectral Similarity
&
RT & m/z - Select to merge scans based on similarity and on RT
and m/z values. For more information, see the discussion under Settings in instrument.txt.
- Precursor Selection
Purity
& RT & m/z - Select
to merge scans based on RT and m/z values, as well as Precursor
Selection Purity, which automatically calculates the proportion of ion
current in the isolation window of a high resolution MS1 scan
represented by the isotope cluster of precursor ion assigned to the
resulting MS/MS scan. If the value is <75%, the MS/MS scan is
ineligible for merging.
- Precursor Selection
Purity
& Spectral Similarity & RT & m/z - Select to merge scans based on all the
possibilities for merging.
- Specialty MS/MS Merging Options - For Agilent
ion trap data files that contain spectra that alternate
between CID and ETD, the software merges the ETD spectra the same way as the corresponding CID spectra. For example,
if the CID spectra were merged from scan 2 thru 12, then the ETD spectra are merged from scan 3 thru 13.
In no case are ETD spectra merged with CID spectra. For Thermo Fisher Scientific data the merged MS/MS spectra must also
be acquired with the same dissociation method (CID, HCD, PQD, or ETD) and the same resolution, unless otherwise specified
by the following specialty merging options.
- Same resolution
- Merge CID & HCD MSn
- Merge CID & PQD MSn
- Different resolution
- Merge ion trap CID & HCD MSn immonium ion region.
Data can be acquired to generate 2 separate spectra with iTRAQ/TMT reporter ions at high collision
energy using HCD, and sequence ions at lower collision energy using CID.
When merging is done, the reporter ion instensities are stored in the
specFeatures files associated with the CID MS/MS spectrum for later use
in quantitation. The peaks are also inserted into the CID spectrum
(replacing any prexisting CID peaks at those masses).
The inserted peaks are scaled to be less intense than the base CID peak
to prevent interfering with subsequent identification and to facilitate spectral viewing.
The unscaled intensities are stored in the specFeatures file and used later
for quantitation.
- Merge MS2 and MS3 spectra from same
precursor: This option appears only when you select *.d
or *.raw data files. If the data does not contain MS3 scans (for
example, Q-TOF), the
setting is ignored. Select from the following list of options:
- Merge - merge the MS2 and MS3 data
from the same precursor ion
- Merge 5x MS3 intensity - multiply the
intensities of the MS3 peaks by 5 (to make them more
comparable to the MS2 intensities) and then merge the MS2
and MS3 data from the same precursor ion
- Create separate extracted files for MS3 spectra -
save the MS3 spectra separately for searching
- Ignore MS3 spectra - ignore the MS3
data and extract only the MS2 data
- Ignore MS2 spectra - ignore the MS2
data and extract only the MS3 data
- Peak Merging - When spectra are merged, many of the
corresponding peaks in the spectra will not have identical mass; hence
using a tolerance of +/- 0.25 Da (for ion trap data) the peaks are
merged by summing the intensity and retaining the mass of the most
intense peak (does not try to centroid). This attempts to correct
artifacts resulting from prior centroiding of the individual spectra.
Merge settings for
Agilent instruments in instrument.txt
The Agilent extractor merges MS/MS
spectra only if they are similar. This
avoids merging closely eluting or co-eluting isobaric peptides. The
parameters that control the merging are set in
E:\SpectrumMill\msparams_mill\instrument.txt:
| merge_num_peaks |
For similarity merging of MS/MS spectra, the number of peaks
that match between the two spectra must be greater than or equal
to merge_num_peaks, which is a number between 0 and 50. The
similarity merging takes the top 50 peaks from both spectra and
compares them. |
| merge_SPI |
For similarity merging of MS/MS spectra, the percentage of
the total intensity of the top 50 spectral peaks that is matched from
spectrum A to spectrum B and from spectrum B to spectrum A must be
greater than or equal to merge_SPI, which is a number between 0
and 100. |
With the exception of the Agilent Q-TOF, all Agilent instruments that
generate MS/MS data use the defaults of merge_SPI = 70 and merge_num_peaks
= 25, but if you add an entry to instrument.txt, that
overrides the defaults. The Agilent Q-TOF uses merge_SPI = 50
and merge_num_peaks = 5, and the software merges only fragment
ions that are within a 0.05 m/z mass tolerance.
If a significant number of peptides appear twice in the summary
report, and the peptides do not have different charge states or
different labels (for example, D0 and D8), then
it is possible you need to modify the settings in instrument.txt.
Before you do so, first increase the windows for Merge scans with
same precursor m/z in the Data Extractor form. If changing the
extractor settings does not produce satisfactory results, then modify instrument.txt
to set merge_SPI to a lower value. Try a small change first,
for example, change from merge_SPI = 70 to merge_SPI = 65.
The format in instrument.txt is merge_SPI, followed
by a tab, followed by the value.
You can also try setting merge_num_peaks to a lower
value (down to 20 or 15). This may be useful for some MALDI MS/MS
spectra where sequence coverage is low and there are only a few large
peaks in the spectrum.
For more information about modifying instrument.txt,
click here.
To customize merging,
see this Help section for the
Data Extractor form.
Precursor m/z & Charge Assignment
Note: These options are not available when you mark
the check box Show only MS (PMF) parameters.
- Default/Find/Force - See Precursor
Charge Assignment for MS/MS Scans.
If you choose Find, the following options are available:
If you choose Default, the following option is available:
- Find 12C - Mark this check box to
compensate for the fact that the mass spec control software may have
selected the 13C peak for MS/MS. See Peak Detection.
If you choose Force, the following option is available:
- Force (z): Forces the charge state to the specified
value or range of values.
- MS Noise Threshold
- Applies only to Agilent Q-TOF data. The default value of 100
counts is fine for most data. For data acquired with the Agilent
6550 Q-TOF, a higher value might provide better results. The increased
sensitivity also can increase non-peptidic background signals. If you observe
that the overall background is much higher than 100 counts, specify a value
that filters out much of the background.
Precursor Charge Assignment
for MS/MS scans
Default mode - if instrument does not assign
charge, the charge is assigned as 0 (ambiguous charge) unless
it can be determined to be +1 as described in Find mode.
Force Mode - charge assigned as designated by the user.
Find Mode - fixed charge assigned if it can be determined as
described below, otherwise 0 (ambiguous charge) assigned.
For Agilent Q-TOF data: The
software examines the MS spectra for the precursor ions and calculates
the theoretical isotopic distribution for all charge states from +1 up
to Maximum (z ), which is set in the Data Extractor form. It
then uses a least squares fit to determine which is the best match for
the monoisotopic peak and isotopic distribution in the experimental
spectrum. The software performs a least squares calculation for each
spectrum across the elution profile of the chromatographic peak and
then centroids. If the check box for Find 12C is
marked, then it replaces the original monoisotopic mass with the
centroided mass, to provide better mass accuracy.
For Agilent Q-TOF data, the software performs the charge assignment
prior to peak merging, which is the opposite of the order for
low-resolution data.
For ion trap (low-resolution)
CID data: Tests below are performed in the order listed.
- +1 If No Peaks Above Precursor - if after peak detection
as described above, there are no remaining peaks in the MS/MS spectrum
above the precursor m/z value with an additional allowance of
2.5 m/z for precursor isotopes, then the precursor charge is
assigned as +1.
- +2 from b/y pairs in MS/MS scan - if after peak detection
as described above, there are at least 3 b/y pairs (pairs of peaks
which add up to the mass of putative precursor MH+ +
hydrogen), then the precursor charge is assigned as +2. Note that this
calculation is dependent upon the putative precursor m/z (as
adjusted by user designation of Find precursor 12C ) and
the user-designated tolerance allowed for merging scans with the same
precursor m/z.
- +2 to Max z by checking MS scan for precursor charge
distribution - the MS scan preceding the MS/MS scan is examined for
peaks corresponding to additional charge states of the peptide's
precursor m/z. Peaks corresponding to possible additional
charge states in the MS scan are subject to a signal/noise calculation
as described in the Peak Detection
section and the user-designated mass tolerance allowed for merging
scans with the same precursor m/z. After finding possible
alternate charge states, the following further restrictions must be met
before assigning the precursor charge:
- disregard possible higher charge states found below m/z
= 500 (chemical noise present).
- to assign z > 3, 2 additional charge states must be found.
- to assign z = 3, an additional +2, or +4 and +5 must be
found.
- to assign z = 2, an additional +1 or + 3 must be found.
For Agilent ion trap ETD data:
The software examines the MS/MS spectra for a pattern of peaks with
reduced charge states, finds the pattern that is most complete, and
uses that information to assign the charge state to the precursor ion.
It tests all possible precursor charges from +1 up to Maximum (z ),
which is set in the Data Extractor form.
For example, to test z = 4 the software looks in the MS/MS spectrum
for peaks that correspond to reduced charges of +3, +2, and +1. To test
z = 5, it looks for peaks that correspond to reduced charges of
+4, +3, +2, and +1. The charge state that produces the most complete
pattern is the one that is picked.
For Thermo Fisher Scientific ETD data: Charge assignment uses
four different tests. If any of the four methods provide a charge, the
software assigns the charge unless there is a conflict. If none of the
four methods provide a charge, the software creates a .0 pkl file. The
four tests are:
- Precursor isotope spacing in the MS survey scan (only if the scan
used enhanced scan rate resolution or higher)
- Additional precursor charge states in the MS survey scan
- Additional reduced precursor charge states in the ETD MS/MS scan
- Complementary c/z ion pairs in the ETD MS/MS scan
Data Extractor for Generic (Peak List)
Files
The generic Data Extractor serves two basic functions for MS/MS
spectra: spectral quality filtering and spectral feature calculation.
The generic Data Extractor is automatically invoked for files that
contain peak lists. It handles only spectra with peaks that have all
already been centroided. The generic Data Extractor also processes *.mgf files that
contain centroided spectra.
The generic Data Extractor performs many of the functions that the
raw file Data Extractor does, but since it can not similarly read the
raw mass spectral files, neither chromatographic time information nor
MS scan data is available. Like the raw file Data Extractor, the
generic Data Extractor creates the SpecFeatures.1.tsv file that
contains Spectral Features such as total
intensity and Maximum Sequence Tag Length. These features are used in
the MS/MS Search, Sherenga de novo Sequencing, Protein/Peptide
Summary, and Spectrum Summary scripts.
Settings in instrument.txt
By default, this extractor expects files that contain data that has
been centroided only - not signal-to-noise processed or de-isotoped.
For generic data, it is best to let the Spectrum Mill
do the signal-to-noise processing and de-isotoping/charge-assignment.
If your instrument software performs these functions, then add
the following to the section of E:\SpectrumMill\msparams_mill\instrument.txt
that applies to your instrument:
bypassSignalNoiseThresholding 1
bypassDeisotoping 1
If you want your instrument software to do signal-to-noise thresholding
but not de-isotoping/charge-assignment, then add the following to the
section of instrument.txt that applies to your instrument:
bypassSignalNoiseThresholding 1
bypassDeisotoping 0
For more information about modifying instrument.txt,
click here.
Files generated
When you process appended *.pkl files, the software
generates individual spectral files with the following naming
conventions:
prefix.pkl - The starting file containing multiple spectra
prefix.scanNumber.0.parentCharge.pkl - A resulting file
containing an individual spectrum
scanNumber: the consecutive order of the spectrum in the
starting file
0: placeholder where function number would be if created by
ProteinLynx
parentCharge: charge of the precursor ion for the spectrum
MS/MS Spectral Quality Filtering and
peak detection are performed as with raw
file Data Extractor.
*.mgf file support
The Generic Data Extractor can parse most *.mgf files. To get the
best results, make sure that the PEPMASS lines contain both mass and
intensity values, and that the CHARGE line is reported.
To optimize results, you may need to
change settings for your instrument
or define a new instrument type in E:\SpectrumMill\msparams_mill\instrument.txt.
The instrument.txt setting for MALDI-TOF-TOF is configured
for *.mgf files where the data has been centroided, signal-to-noise
filtered, and de-isotoped. With the hiEnergyCID setting of 1
in instrument.txt, the search score is not penalized for
unassigned peaks.
If your spectra contain many noise peaks, when you search the
spectra, reduce the value for Minimum scored peak intensity.
Likewise, when you validate and summarize data, reduce the % SPI
and Score filters.
MS/MS Search
Filters for excluding files from MS/MS searches are
described here. MS/MS Search itself is described in the
MS/MS Search Help.
Search Filters
Features for excluding files from a group of MS/MS searches are covered
here.
- Data Directories - Designates the base sample directory
where a directory of spectral input files can be found.
- Validation filter - allows searches to be restricted to
those files that have or have not been assigned a validation state using Protein/Peptide Summary
or Spectrum Summary.
- Sequence tag length - allows data
set files to be skipped that have a low number of ions constituting an
ion series separated by
amino acid masses.
- Minimum detected peaks - allows files in the data set
that have a low number of peaks remaining after peak detection to be
skipped.
- Spectrum files - Designates the particular spectral input
files; note that wildcards can be used to specify a set of filenames.
- Fragmentation mode - Can filter searches based on CID, ETD, HCD and/or PQD
fragmentation modes; near Data Files.
- Precursor mass tolerance - can be specified in either Da or ppm.
MS/MS Autovalidation
The MS/MS Autovalidation page permits automatic validation of
results meeting user-set score thresholds. Two major differences
exist between the validation done with this page and the validation
done with the Protein/Peptide Summary page. The first difference
is that with Autovalidation, the validation occurs in a single step;
the validation states are immediately written to file. The second
difference is that Autovalidation permits validation using
charge-state-dependent score thresholds.
Note that when you validate files via either autovalidation or
manual validation (Protein/Peptide Summary page), the software lists
validated hits and spectra. These are cumulative and include both the
new hits and spectra you just validated, as well as those you validated
previously.
False Discovery Rate
With any protein database search, you get some
top hits that are correct and some that are not. In the Spectrum Mill
workbench, you (or the autovalidation software) can judge which hits
are more likely to be correct, based on database search score and %SPI
(the percentage of the extracted spectrum that is explained by the
database search result). To further ensure the quality of results, the
Spectrum Mill allows you to autovalidate database search
results based on false discovery rate (FDR) – a percent FDR that you set and that
provides an independent measure of the likelihood that the results are
correct.
To calculate the FDR, the software needs the
results of the search of a decoy database. It gets these results when
you mark the check box (in MS/MS Search) for Calculate reversed
database scores. To calculate %FDR, it compares the number of
top database hits from the reversed
database search to the total number of top hits. It multiplies the
decoy top hits by 2, under the assumption that for each incorrect top
hit in the decoy (internally reversed) database, there exists an
incorrect hit in the forward database (SwissProt, or whatever database
you searched).
Note: To publish the calculated %FDR, use the
calculations available under Quality Metrics & FDR.
Strategies/Modes
To use false discovery rate calculations most effectively for your
situation, Agilent has provided a number of options for autovalidating
the matches and estimating the false discovery rate. You can
choose from among three Autovalidation strategies:
- Fixed thresholds:
Run Autovalidation first in Protein details mode, where you set
fixed thresholds for different scores, above which the protein is
valid, and then in Peptide mode, again where you set fixed thresholds
for different scores, above which the peptide is valid. In both modes
you can calculate an FDR using reversed hits. This FDR is the global FDR
at the spectral level.
- Auto thresholds:
Run Autovalidation first in Peptide mode, where the score and R1-R2
score thresholds are automatically optimized until a target % FDR, which you
enter, is reached, and then in Protein Polishing mode.
In Protein Polishing mode the intention is to achieve a target protein
FDR and increase the sequence coverage of validated proteins. The
first objective is achieved by unvalidating previously validated
peptides. This capability allows you to autovalidate marginal
peptides during peptide autovalidation; yet the protein FDR is kept
under control by unvalidating the marginal peptides that cause trouble
at the protein level. The second intention is achieved by
recalculating the peptide FDR only on the subset of peptides from
validated proteins. This generally results in increased sequence
coverage of the validated proteins.
- Auto thresholds - discriminant: Run
Autovalidation first in Peptide mode, where either a global FDR
or a local FDR is set (see Global versus
Local FDR below) and the discriminant score thresholds
are automatically optimized until the FDR you entered is reached. Then run
Autovalidation in a Protein Polishing mode (see description above). You must have searched with
Discriminant scoring set to something other than Off.
You can use all of these strategies and
modes with Workflow Automation, but only certain sets in
recursive workflows. A recursive workflow
involves successive searches and validations; for example, identity
search, followed by autovalidation, followed by a variable modification
search on a smaller database, followed by autovalidation. The
recursive workflow is incompatible with the global FDR, calculated by
the Optimize score and R1-R2 ...option in the Auto
thresholds/Peptide strategy/mode and by the Global FDR
option in the Auto thresholds-determinant/Peptide strategy/mode. The
recursive workflow leads to subsets, each of which can have different
characteristics, while the global FDR calculates a single FDR value
over all matches under the assumption that all the matches have uniform
characteristics on average. Therefore, you can use only the Fixed
threshold strategy/modes and the Auto
threshold-determinant/Peptide/Local FDR option in recursive workflows.
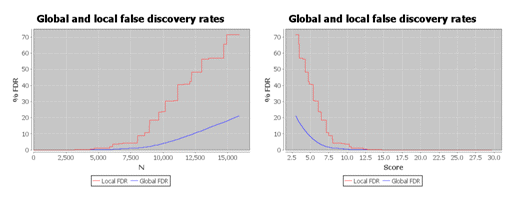
Global versus Local FDR
With the Auto threshold-determinant strategy
Peptide mode, you can autovalidate by either Global FDR or Local
FDR. The Global FDR gives an overall error rate for
validated peptides in the entire data set. You choose a cutoff (for
example, 1% FDR) for which you accept results. That means in the
overall data set, 1% of the identifications are likely to be wrong.
However, an individual validated peptide may have a much higher chance
of being wrong, which is especially true for the lower-scoring results.
If that is a concern, you can use the Local FDR.
To calculate Global FDR, the program
orders the identifications from best (highest discriminant score, or
highest score if discriminant score is disabled) to worst (lowest
score), then sums the total number of hits to the reversed database (D)
and the total number of hits to both forward and reversed databases
(N). Then it calculates FDR as:
FDRglobal = 2D/N
The Local FDR measures the quality of
each individual peptide identification. It answers the question, "If I
accept this hit as a correct answer, how much does that increase my
false positive rate?" As with the global FDR, you choose a cutoff (for
example, 1% FDR) for which you accept results. The local FDR
calculation uses the equation:
FDRlocal = 2 dD/dN
In other words, it plots D on the y-axis versus
N on the x-axis, and takes the derivative at each (D, N) pair. (See
example graphs below.) This plot is not smooth, which causes local
variations in the derivative. To get more reliable results, the program
first fits a function to the plot, then takes the derivative of the
function at each point.
As shown below, the local FDR is generally a more stringent measure of quality, so it usually gives fewer validated
hits than global FDR.
For more information, see:
Tang, W. H.; Shilov, I. V.; and Seymour, S. L.
"Nonlinear Fitting Method for Determining Local False Discovery Rates
from Decoy Database Searches;" J. Proteome Res.; 2008; 7;
3661-67; DOI: 10.1021/pr070492f.
FDR at the PSM, Peptide, and Protein Levels
FDRs can be calculate at different levels: peptide spectrum match (PSM), peptide, and protein. The Autovalidation form
in the Spectrum Mill calculates FDR at the PSM and protein levels, while the Quality Metrics module calculates
FDR at all levels. The difference between the PSM level and the peptide level is that the PSM level may include multiple
spectra for the same peptide, while the peptide level uses only the highest-scoring spectrum for each peptide.
Therefore, the peptide level is a more stringent calculation.
MS/MS Autovalidation and Workflows
Autovalidation strategies in Spectrum Mill
There are three Autovalidation “strategies” in the Spectrum Mill, and each
provides both a peptide-level and a protein-level Autovalidation mode, but there
are some differences. In general, the Auto thresholds strategy is recommended,
but there are cases where the other strategies should be used. This is discussed
in the Suggested Workflows section.
FDR
Determination of a false discovery rate (FDR) requires the data be searched with
Calculate
reversed database scores enabled. When enabled, Spectrum Mill reverses the
sequence of amino acids in the peptide that are between the termini. For
example, “SAMPLER” is also searched as “SELPMAR”. This allows for the search to
use the same peptide mass, and it is faster than searching a decoy database. FDR
calculations require a sufficiently large database so that false positives can
be determined. This has implications for searching single protein or small
species subsets, and when searching saved results.
The actual FDR obtained can be determined in the
Quality Metrics & FDR page.
Auto Thresholds
The Auto thresholds strategy is available in B.04.00 and later, and is the
default. With this strategy, the Peptide mode is done first and optimizes the
score and Rank1-Rank2 score thresholds to reach a specified maximum FDR. This
mode allows for various peptide filtering settings which are applied prior to
validation. The Protein polishing mode can then be used to remove one-hit
wonders and increase coverage of valid proteins. Note that Peptide followed by
Protein polishing is the reverse order than what is done in the
Fixed thresholds strategy.

The Auto thresholds strategy is the recommend strategy to use in most
cases. Note that you first perform Peptide mode, then optionally use
Protein polishing.
Peptide mode
For each
precursor charge state, the matrix of score and Rank1-Rank2 values are examined
to find the values that yield the maximum number of peptide spectrum matches
below the designated FDR threshold. For datasets or charge states that have
small numbers of peptides, you should choose to optimize across an entire
directory rather than across each LC-MS/MS run. In peptide mode,
when you use the Auto thresholds strategy multiple times on the same directory, each time it
only optimizes using the not-yet-valid peptide spectrum matches. The results
of each round are appended to the pool of previously valid spectra. Use the
Quality Metrics & FDR tool to calculate the final combined FDR.
Protein polishing mode
The Protein polishing mode has two goals: (1) achieving a target protein FDR,
and (2) increasing the sequence coverage of validated proteins. Before using
this mode, you must use the Peptide mode.
Both goals are achieved by unvalidating previously validated peptides.
This unvalidation capability enables you to autovalidate marginal peptides
during peptide autovalidation, yet the protein FDR is kept under control with
subsequent protein polishing by unvalidating the marginal peptides that belong
to marginal proteins.
Fixed Thresholds
The Fixed thresholds strategy is similar to the “classic” (A.03.03 and
prior) Autovalidation, but now provides the option to calculate an FDR. New
peptide filtering options are also available. In this strategy, validation is
done first with Protein details mode, and then can optionally be followed with
Peptide mode. The Quality Metrics & FDR page can be used to determine the FDR
that was obtained.

Enhancements over the “classic” Autovalidation include:
- Ability to calculate FDR using reversed hits. Note that if the FDR
calculation is enabled, the reversed hits cannot be also used for threshold
filtering – that is, the Fwd-Rev Score Threshold filter can not be
selected. The FDR calculated is the global FDR at the spectral level.
- Ability to optimize score and R1-R2 score thresholds for each run with
max FDR using reversed hits
- Filtering on precursor mass error
- Multiple filtering options that are variable for each run or fixed range
for all runs
- Can require or disallow certain amino acids (AAs )
Auto Thresholds - Discriminant
Discriminant Scoring allows additional factors (%SPI, Backbone Cleavage
Score, Number of Complementary Fragments, Matched Sequence Tag Length, Peak
Match%, Charge, Rank1-Rank2 Delta) to contribute to the scoring used in the
Autovalidation.
To use this strategy, Discriminant Scoring must be enabled in the search.
Effective use of discriminant scoring requires the careful curation and
validation (using one of the other Autovalidation modes and manual validation)
of a representative data set. The Tool Belt Calculate discriminant scoring
coefficients tool is then used to create the coefficients. Several
precalculated sets are provided for evaluation. Note that selection of Score
in the MS/MS Search defeats the purpose of the discriminant mode, and is there
for backwards compatibility only.

The FDR target may be applied to either Local or Global levels.
Peptide mode - Global FDR
In this mode, the program calculates the global peptide FDR at the spectral
level. The global FDR is the percentage of all the peptide identifications that
are likely to be false. It is a calculation for a collection of peptides across
the data set you are validating. The program adjusts the validation thresholds
for peptide score (or discriminant score) until it meets the %FDR that you
typed. This mode does not support recursive workflows with successive
validations and searches.
Peptide mode - Local FDR
In this mode, the local FDR
measures the error rate for individual peptides at the spectral level. While
the global FDR focuses on a collection of peptides, the local FDR answers the
question, "Does this peptide identification increase the FDR? If I validate this
identification, how many additional false positives am I likely to get?" This
mode supports recursive workflows with successive validations and searches.
Compared to the global FDR calculation, the local FDR calculation requires an
additional curve fitting step and is thus less robust from a computational
standpoint than the global FDR calculation. The larger the data set, the more
reliable the curve fitting becomes and hence the more reliable the calculated
local FDR value. You should review the curve fitting, which you can see by
clicking on an entry in the FDR search # column and looking at the graph titled
“Fit quality for computing local false discovery rate.”
Recursive Workflows
Note: Prior to
Spectrum Mill B.04.00, the recommendation for variable modification
searches was to always search first with Identity mode, validate, then search in
Variable mode. Because of both search performance improvements and the ability
to Autovalidate to an FDR, the initial search should now include the expected
variable modifications.
In recursive workflows, an initial search is done with the expected variable
modifications. The results are then Autovalidated. Additional searches are then
run with Search previous hits selected. This restricts the search to only
those proteins that were identified and validated in the initial search. Typical
uses of a recursive search are to search with a different variable modification
(usually a different one for a modification that was applied during the initial
search), or a different enzyme. Setting the Validation filter
to spectrum-not-marked-sequence-not-validated reduces the search space to those
spectra that were not validated after an earlier search.
It may be the case that changing the modifications and enzyme selections will
result in completely different proteins being found during the MS/MS Search. You
can combine these additional results with your previously found results by
clearing the check boxes for both Remove all prior MS/MS Search results and Search previous
hits.
Autovalidation Strategies and Recursive Searches
When you do recursive searches, only the following Autovalidation strategies
should be used to Autovalidate after each recursive search:
- Fixed thresholds (Protein Details, followed by optional Peptide)
- Auto Thresholds – Discriminant, with Local FDR
The Auto thresholds strategy (either
Peptide or Protein polishing mode), and the
Auto thresholds – Discriminant strategy with Global FDR mode should
not be used. While it
might be tempting to Clear All prior validations prior to Autovalidating after
recursive searches, this will not provide an accurate FDR, because the size of
the search space is different for each round and thus the delta R1-R2 scores are
not comparable.
Suggested Workflows
Auto thresholds Strategy
This workflow begins with the Peptide mode. It can then be followed by the
Protein Polishing mode. Use of the latter may remove previously validated
peptides to meet the protein FDR% target.
This Autovalidation workflow should not be used with recursive search
workflows. The implication is that Variable modifications searches must be done
in the initial search step. Additional (recursive) searches should be followed
by one of the Autovalidation strategies that support recursive searches.
Fixed threshold Strategy
When using this strategy, first do Protein Details validation, then
optionally follow with Peptide validation. Do not clear the validations
between searches.
Auto thresholds - Discriminant Strategy
This workflow begins with either the Peptide Global or the
Peptide Local Autovalidation. (Do not do both.)
Either mode can then be followed by the Protein Polishing mode.
Only the Peptide Local Autovalidation workflow can be used in the recursive search workflows.
Which Workflow to Use?
The Auto thresholds strategy automatically
validates for a target FDR%, where it uses both the Score and the
Rank1-Rank2
score to optimize thresholds. It provides various filtering options, and is the
recommended strategy to use. The disadvantage is that it does not support the
recursive search workflow, but it can be used to validate the initial search
results.
The “classic” approach using the Fixed threshold strategy
still works and can be used as a reference point for evaluating the other
approaches. The resulting FDR can be calculated and shown. To change the FDR
target, though, you must change the various Rules settings and redo the
Autovalidation.
The Auto thresholds – discriminant strategy is the
simplest Autovalidation approach for FDR, but only the Peptide Local mode can be
used in a recursive search workflow. The disadvantage is that Discriminant
Scoring must be enabled during the search, and requires that a training set be
carefully validated, although several default sets are provided for evaluation.
Typically, you would use the Fixed Thresholds or the Auto Thresholds
approaches, along with some manual validation, to prepare the data set. The use
of Discriminant Scoring allows additional factors (%SPI, Backbone Cleavage
Score, Number of Complementary Fragments, Matched Sequence Tag Length, Peak
Match%, Charge, Rank1-Rank2 Delta) to contribute to the scoring used in the
Autovalidation. For small data sets, the local FDR calculation may be unreliable
and it is wise to use the global FDR.
Quality Metrics & FDR
All of the peptide Autovalidation modes calculate the spectra level FDR. The
Protein polishing Autovalidation calculates the protein level FDR. The
only place the distinct peptide level FDR is calculated is in the Quality
Metrics & FDR page. The FDR may be reported at the spectra level, distinct
peptide level, and protein level.
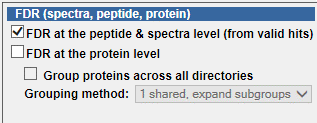
To Use the Autovalidation Form
The following topics describe options available on the MS/MS
Autovalidation form. In general, you should retain the
default settings, except for the options highlighted in red text on the
form. For more details, see MS/MS Autovalidation.
Automatic Validation
- Validate Files - Click to validate
search results and spectra. Click this button after you have either
loaded a parameter file or manually set the parameters. The name of the
current parameter file appears in red at the top of the form. Once you
have saved a parameter file, you may start the autovalidation from a
workflow rather than manually
with the Validate Files button. Whether you use the workflow or
not, you usually validate twice, first in Protein Details mode and
second in Peptide mode.
- Queue request - Mark this check box if
you want the autovalidation to occur after a queued MS/MS search has
completed for the selected data directories. That is, mark the check
box if you want to do interactive
automation. If you want to validate immediately, clear the check
box.
- Undo Last - Click to remove results of
the last autovalidation you performed for the data set(s) you selected.
- Clear All - Click to remove results of
all autovalidations for the data set(s) you selected.
- Save As - Click to save current
autovalidation settings in a parameter file.
- Load - Click to load a parameter file
that contains settings for autovalidation. For default values, select a
parameter file from the Defaults folder.
Data Directories
- Click the Select ... button to select a data directory or
data directories. See Selecting
Data Directories.
- Fragmentation
mode:
Select the mode whose data you intend to use for autovalidation, thus
filtering out data from other fragmentation modes. This lets you
set different score thresholds for different fragmentation modes to
enable more convenient integrated processing of data with a mixture of
fragmentation modes in the same directory. Agilent no longer
supports
the "MIX" Instrument selections because their
purpose is now met with the Fragmentation mode capability.
- All - default selection; do
not change if you do not intend to differentiate scoring based on
fragmentation modes; use for Agilent Q-TOF and other instruments that
only acquire CID.
- CID only - Agilent Q-TOF
and
ion trap
- ETD only - Agilent ion trap
- HCD only - ThermoFinnigan
- PQD only -
ThermoFinnigan
- Search result files: Modify this list if you want to
summarize only a subset of the files in the data directory. Wildcards
(*) are supported. To see the names of your search result files,
look in the results_mstag subdirectory under the directory
where you placed your raw files. This list
now includes *.spo files.
Validation
Strategy/Mode
For
an introductory explanation of the strategy/mode selections, see Strategies/Modes. Select
from one of three strategies for autovalidating proteins and peptides
in the search results and then select a mode associated with the
strategy:
- Fixed
thresholds
- Select if you intend to autovalidate using the fixed Score Threshold,
%SPI Threshold and the Rank 1-2 score Threshold in the Protein/Peptide
Rules table. If you choose this option you can also choose to calculate
a False Discovery Rate (FDR) for the
autovalidation for either of the two available modes. Modes
available for this strategy are Protein
details and Peptide. You can set up workflow automation with
parameter files for Autovalidation - Protein details and Autovalidation
- Peptide. Select Protein details first and save the parameter
file; then select Peptide and save the parameter file.
- Protein details
- In this mode, the
program summarizes results by protein, and considers all the peptides
that belong to a given protein. Using the default scoring,
individual peptides must have scores greater than 6 to 12 (depending on
charge state), and the cumulative protein score must be greater than
20. By default, the %SPI, a measure of how much of your
extracted spectrum is explained by the database result,
should be greater than 60 to 90, depending on charge state and score. A
lower value may produce more false positives, but they can reviewed in
Protein/Peptide Summary.
- Peptide
-In this mode, the program
summarizes results by peptide. Even if it finds only a single peptide
corresponding to a protein, it will validate the corresponding search
results provided that the peptide score is high enough. Using the
default scoring, individual peptides must have scores greater than 11
to 15 (depending on charge state), with %SPI greater than 60 to
70 (also depending on charge state). This score threshold is higher
than in the Protein details mode,
where you have the additional assurance of knowing you have
identified more than one peptide per protein. The chance of false
positives increases at higher charge states, so it is a good idea to
set higher score requirements for higher charge
states.
- Auto thresholds -
Select if you intend to autovalidate by optimizing the score and delta
R1-R2 thresholds to reach a specified target FDR. This selection
also
automatically calculates an FDR. Modes available for this
strategy are Peptide, Protein Polishing, and VM site Polishing.
- Peptide
- For the Auto thresholds selection, this mode summarizes results by
peptide but instead of using a rule set with fixed thresholds,
automatically optimizes the thresholds until the target FDR specified
is reached. Validate using this mode first, then select the
Protein Polishing mode. Note that the default value is 1.2%. This
means that the final calculated FDR with all of the charge states is
closer to 1% when you set the target FDR for each charge state to
1.2%.
- Protein Polishing and VM site Polishing
- These modes polish in the sense that they only
consider PSMs that have already been marked as valid via previous
rounds of automated or manual validation. The modes were specifically
built with the intent of being used after peptide mode has been applied
to optimize score thresholds. Protein Polishing mode allows for a specified FDR to
be reached at the protein level. A false protein is considered to
be one composed entirely of distinct peptides with delta Fwd-Rev score
<= 0. It enables you to be aggressive with peptide level FDR
thresholds and then come back and remove protein 1-2 hit wonders. The
final FDR levels at the protein and peptide level can always be
calculated using the Tool Belt search statistics page.
- Auto
thresholds - discriminant -
Select if you intend to autovalidate by using discriminant scores to
reach a specified target FDR. Be sure to enable discriminant scoring in
the MS/MS Search before using this strategy. You begin with the
Peptide mode, then use the Protein Polishing mode.
- Peptide
- For the Auto threshold - discriminant selection, this mode summarizes
results by peptide by calculating the global peptide FDR or local
peptide FDR. The program adjusts the validation thresholds for
peptide discriminant score until it meets the %FDR you specify.
- Protein
Polishing - See explanation above.
Validation
Parameters: Fixed Thresholds
These parameter fields change depending on
the strategy and mode you select. See the explanations above for
each strategy and its associated modes. Below are the parameter fields
for the Fixed thresholds strategy.
Protein
details mode
- Minimum protein score: Set the
cumulative protein score (adds scores entered in Protein Rules section)
that must be met for automatic validation
- Group proteins across all directories -
In the Protein details mode, allows peptides from multiple
directories of data files to contribute to protein score. Mark this
check box if you placed your data files from a given sample into
multiple subdirectories.
- Minimum number of directories a protein group is observed in -
In the Protein details mode, specifies the lowest number of directories
in which a protein group must be observed for a validation to occur. The greater
the number, the better confidence you have in the identification.
- Minimum protein score -
In the Protein details mode, specifies the lowest score required for a
validation to occur.
- Calculate FDR using reversed hits -
Mark this check box if you marked the check box for Calculate
reversed database scores in the MS/MS Search form, and now you want
to use the reversed database scores to calculate a false positive rate.
See Reversed Database Search.
If you mark this check
box, you cannot mark the check box for Fwd - Rev Score Threshold
(under Protein Rules) and vice versa. You must mark
this check box if you want to calculate a false discovery rate in the
Tool Belt.
- Min Sequence Length - Specify the minimum length of the sequence
for which a validation will occur. Longer amino acid sequences provide
better confidence.
Filtering
You choose from one of these two options:
- None - Click this radio button to turn off filtering
- Fixed Range for all runs
- Filter precursor mass error - Click this radio button to
exclude from validation peptides whose precursor mass errors are below
or above the range of values you enter. Then type the Low and High
mass error.
Protein Rules
These rules permit
validation of proteins that match specified criteria.
- Precursor Charge - establishes the charge
state for which the rule applies
- Score Threshold - lowest score for
which peptides are validated
- % SPI Threshold - lowest Scored Peak
Intensity (SPI) for which peptides are validated. SPI is a measure
of how much of your extracted spectrum is explained by the
database match.
- Fwd - Rev Score Threshold - minimum
difference between forward and reversed search scores for which
peptides are validated. You cannot mark this check box if the check box
for Calculate FDR using reversed hits
is marked.
- Rank 1-2 Score Threshold - minimum
difference between the scores of the top and second highest scoring
database hit for which peptides are validated
Peptide mode
- Calculate FDR using reversed hits -
Mark this check box if you marked the check box for Calculate
reversed database scores in the MS/MS Search form, and now you want
to use the reversed database scores to calculate a false positive rate.
See Reversed Database Search.
If you mark this check
box,
you cannot mark the check box for Fwd - Rev Score Threshold
(under Peptide Rules)
and vice versa. You must mark this check box if you want to
calculate a false discovery rate in the Tool Belt.
- Min Sequence Length - Specify the minimum length of the sequence
for which a validation will occur. Longer amino acid sequences provide
better confidence.
- Required AAs: Validates peptides only if they contain the
required amino acid(s). To disable, select any. See Amino Acid Filtering.
- Disallowed AAs: Peptides are not validated if
they contain disallowed amino acid(s). To disable, select none.
See Amino Acid Filtering.
Filtering
Use the settings for Automatic variable range for each run when
your runs contains
peptides with very different
values for these parameters. The program calculates a range of
expected values based on the amino acid sequences of the peptides, and
filters those peptides from the list whose parameter values are above
or below the set percentile range (25-75 percentile?). Use the
settings for Fixed range for all runs when your runs contain peptides most of whose
parameter values lie within a similar range. Or use with only one
run.
- Precursor mass error filter - You can make only one choice from the options below:
- None (ppm) - Click to turn off the following two filters:
- Auto precursor mass error - Click to exclude from validation any peptides whose
precursor mass errors are estimated to be below or above a set
percentile range of
values.
- Fixed precursor mass error - Click to
exclude from validation peptides whose precursor mass errors are below
or above the range of values you enter. Then type the Low and High
mass error.
- Solution Charge/peptide pI filters - You can make only one choice from the options below:
- None (SC/pI) - Click to turn off the following four filters:
- Auto SCX Solution Charge, pH3 - Click
to
exclude from validation any peptides whose Strong Cation Exchange
charges at pH3 are estimated to be below or above a set percentile
range of values (calculated from the amino acid sequence).
- Auto OGE/IEF peptide pI - Click to
remove
peptides whose Off-Gel Electrophoresis/IsoElectric Focusing
isoelectric points are estimated to be below or above a set percentile
range of
values.
- Fixed Solution Charge - Click to exclude
from validation any peptides whose
Strong Cation Exchange charges at pH3 are below or
above the range of values you enter. Then type values for the Low
and High solution charge.
- Fixed peptide pI - Click to exclude peptides whose Off-Gel
Electrophoresis/IsoElectric Focusing isoelectric points are below or
above the range of values you enter. Then type values for the Low
and High peptide pI.
Peptide
Rules
These rules permit
validation of peptides that match specified criteria. Note that
there are only five rules, whereas Protein Rules have six.
The score requirements are more stringent in peptide mode, and for
peptides of higher charge states.
- Precursor Charge - establishes the charge state for
which the rule applies
- Score Threshold - lowest score for which peptides
are validated
- % SPI Threshold - lowest Scored Peak Intensity
(SPI) for which peptides are validated. SPI is a measure of how
much of your extracted spectrum is explained by the database match.
- Fwd - Rev Score Threshold - minimum difference between
forward and reversed search scores for which peptides are validated.
You cannot mark this check box if the check box for Calculate FDR using
reversed hits is marked.
- Rank 1-2 Score Threshold - minimum difference between
the scores of the top and second highest scoring database hit for which
peptides are validated
Validation Parameters: Auto Thresholds
These parameter fields change depending on
the strategy and mode you select. See the explanations above for
each strategy and its associated modes. Below are the parameter fields
for the Auto thresholds strategy.
Peptide mode
- Optimize Score & R1-R2 score thresholds with max FDR
- Type a %FDR value that you do not want to exceed as a target for
optimizing the R1-R2 score thresholds. As a starting point this will use the score and R1-R2 score separately to determine
maximum thresholds. Combinations of the two are then explored to maximize the number of peptide spectrum matches, while meeting the FDR threshold.
- Select whether to optimize across each: LC run or Directory. The threshold optimization
is done separately for each precursor charge state and done after applying all the filters described below.
- Precursor charge range - Type the range of precursor charges the program will run
through for optimization. This is helpful for setting different parameters for different
precursor charge state ranges.
- Min & Max Sequence Length -
Select the minimum and maximum sequence tag length for valid peptides. Short peptides are often
not unique in the proteome and can occur in multiple unrelated proteins. A typical minimum length
filter for a human proteomics experiment is 7. When working in xenograft systems (human tumor grown
in mouse) or other systems with a larger space one should increase the filter to 8. A max length filter is
only intended for systems where one is focused on peptides of similar length and might want to
set different parameters for different length ranges.
- Min Backbone Cleavage score (BCS)-
Select the minimum BCS for valid peptides. This enables enforcing uniformly higher minimum
sequence coverage for each PSM, and will have the effect of validating low scoring peptides with
reasonable fragmentation and excluding ones with higher scores from multiple ion types at only
a few peptide backbone positions. Implementation of this filter was motivated by HLA antigens,
which are peptides of length 8-12 AAs, that are search in No enzyme mode and thus have a very
large search space.
- Required AAs: Validates peptides only if they contain the required amino acid(s).
To disable, select any. See Amino Acid Filtering.
- Disallowed AAs: Peptides are not validated if they contain disallowed amino acid(s). To disable, select none.
See Amino Acid Filtering.
Filtering
Use the settings for Automatic variable range for each run
when each run can be expected to contain different medians or ranges for instrument performance or peptide properties.
Use the settings for Fixed range for all runs when all the runs contain
values within a similar range and you have foreknowledge of what that range should be.
- Precursor mass error filter - You can make only one choice from the options below:
- None (ppm) - Click to turn off the following two filters:
- Auto precursor mass error - Click to exclude from validation any peptides whose precursor mass
errors are estimated to be above or below 4 standard deviations from the median.
- Fixed precursor mass error - Click to exclude from validation
peptides whose precursor mass errors are below or above the range of values you enter. Then type the
Low and High mass error.
- Solution Charge/peptide pI filters - You can make only one choice from the options below:
- None (SC/pI) - Click to turn off the following four filters:
- Auto SCX Solution Charge, pH3 - Click to exclude from validation any peptides whose theoretical Strong
Cation Exchange charges at pH3 are above or below thresholds. The thresholds correspond to 2 standard deviations from the
median, with integer rounding after applying the 2 std deviations, max: up to the next integer charge value, or min: down to the next integer charge value.
- Auto OGE/IEF peptide pI - Click to remove peptides whose Off-Gel Electrophoresis/IsoElectric
Focusing theoretical isoelectric points are above or below thresholds. The thresholds correspond to 2 standard deviations from the
median, with integer rounding after applying the 2 std deviations, max: up to the next integer pI value, or min: down to the next integer pI value.
- Fixed Solution Charge - Click to exclude from validation any peptides whose Strong Cation
Exchange charges at pH3 are below or above the range of values you enter. Then type values for the
Low and High solution charge.
- Fixed peptide pI - Click to exclude peptides whose Off-Gel Electrophoresis/IsoElectric Focusing
isoelectric points are below or above the range of values you enter. Then type values for the
Low and High peptide pI.
Protein Polishing mode
The Protein Polishing mode can only be used after validating in Peptide mode.
In Protein Polishing mode the intention is to reach a target protein FDR
and eliminate unreliable protein-level identifications, particularly low scoring proteins that are detected
either by single peptides (so called one-hit-wonders) or proteins infrequently detected when multiple experiments
are being combined across multiple data directories.
These goals are achieved by unvalidating PSMs previously validated in a peptide mode autovalidation step.
This allows one to autovalidate marginal PSMs during peptide-level autovalidation, yet keep the protein FDR under control
by subsequently unvalidating the marginal PSMs that cause trouble at the protein level. Removal of low quality PSMs
should also result in reducing the peptide-level FDR that will be recalculated via Quality Metrics after all autovalidation
steps are complete. Consequently, autovalidation using a 2-step approach of peptide mode followed by protein polishing mode
generally results in increased sequence coverage of the validated proteins as compared to a 1-step approach of peptide-level
autovalidation with a target FDR threshold lowered to be equivalent to what is reached after a combined two-step approach.
- Minimum protein score: Set the cumulative protein score that must be met
for automatic validation
- Group proteins across all directories - Allows peptides from multiple directories of data files to
contribute to protein score. Mark this check box if you placed your data files from a given sample into
multiple subdirectories.
- Protein grouping method: (More detailed description on protein grouping is available)
The selected method determines whether the thresholds for minimum number of directories and protein score are
applied the level of protein group (unexpand subgroups method), or at the level of protein subgroup (expand
subgroups, top uses shared).
The latter choice will tend to remove isoforms/family members when the distinct peptide support for an
isoform/family member is weak (1 low scoring peptide, non-recurrent in multiple experiments).
- Method for applying combined thresholds of Protein Score and Minimum number of directories
- Retain proteins above both thresholds. This option is more strict and will not only eliminate one
peptide/protein, but also one experiment/protein observations.
- Retain proteins above either thresholds This option is less strict and intended to retain one peptide/protein
observations if they are recurrent (observed in multiple experiments). The primary value of this option is when
being applied to multiple data directories at once.
- Minimum number of directories a protein group is observed in: Set the minimum number of directories
required for a protein to be identified in order to be considered valid. When multiple experiments
are being combined across multiple data directories this feature allows exclusion of low scoring non-recurrently observed
proteins, which can be expected to be more likely to be false-positive identifications.
- Automatically raise minimum protein score to yield maximum protein
FDR: ___% - Type the % FDR you do not want the program to exceed as it automatically raises the minimum protein score.
VM site polishing mode
The VM site polishing mode can only be used after validating in Peptide mode.
In VM site polishing mode the intention is to eliminate unreliable VM site-level identifications, particularly low
scoring VM sites that are only detected as low scoring peptides that are infrequently detected when multiple experiments
are being combined across multiple data directories.
This goals is achieved by unvalidating PSMs previously validated in a peptide mode autovalidation step.
This allows one to autovalidate marginal PSMs during peptide-level autovalidation with the potential to increase
sensitivity and diminish the number of missing values for VM site level quantitation across multiple experiments.
Subsequent VM site polishing will then unvalidate marginal PSMs that are non-recurrent. Removal of low quality PSMs
should also result in reducing the peptide-level FDR that will be recalculated via Quality Metrics after all autovalidation
steps are complete. Consequently, autovalidation using a 2-step approach of peptide mode followed by VM site polishing mode
generally results in fewer missing values across mulitple experiments as compared to a 1-step approach of peptide-level
autovalidation with a target FDR threshold lowered to be equivalent to what is reached after a combined two-step approach.
- Group proteins across all directories - Allows peptides from multiple directories of data files to
contribute to protein score. Mark this check box if you placed your data files from a given sample into
multiple subdirectories.
- Protein grouping method: (More detailed description on protein grouping is available)
The selected method determines whether the thresholds for minimum number of directories and protein score are
applied the level of protein group (unexpand subgroups method), or at the level of protein subgroup (expand
subgroups, top uses shared).
The latter choice will tend to remove isoforms/family members when the distinct peptide support for an
isoform/family member is weak (1 low scoring peptide, non-recurrent in multiple experiments).
- Method for applying combined thresholds of VM site score and Minimum number of directories
- Retain proteins above both thresholds. This option is will not only eliminate low scoring
VM sites, but also one experiment/protein observations. This option is perhaps overly strict and
is expected to be infrequently used. Removing it from the UI was contemplated, but left in to maintain
consisitency with protien polishing mode.
- Retain proteins above either thresholds This option is less strict and intended to retain low scoring
VM sites observations if they are recurrent (observed in multiple experiments). This method is expected
to be the default, typically used option.
- Minimum number of directories a VM site is observed in: Set the minimum number of directories
required for a VM site to be identified in order to be considered valid. When multiple experiments
are being combined across multiple data directories this feature allows exclusion of low scoring non-recurrently observed
VM sites, which can be expected to be more likely to be false-positive identifications.
- Minimum VM site score: Set the minimum VM site score
(peptide id score for the representative peptide amongst all the PSM's that contain the VM site) that must be met
for automatic validation.
Validation
Parameters: Auto Thresholds - Discriminant
These parameter fields change depending on
the strategy and mode you select. See the explanations above for
each strategy and its associated modes. Below are the parameter fields
for the Auto thresholds - discriminant strategy.
This strategy uses discriminant scores to
validate the peptides found in the MS/MS search. See
Discriminant Scoring for details.
Peptide mode
Whether you choose the Global FDR mode
or the Local FDR mode, first
make sure that you did the MS/MS Search with the check box marked for Calculate
reversed database scores.
The FDR calculations use the results from these calculations. And you
must also make sure that results of any previous autovalidations or
manual validations are deleted.
- Global FDR - Type a number for the %FDR that is acceptable
for your study. In this mode, the software calculates a global peptide
FDR, which is the percentage of all the peptide identifications that
are likely to be false. It is a calculation for a collection of
peptides across the data set you are validating. The program looks at
only distinct peptides, so if multiple spectra give the same peptide
identification, the program uses only the one with the highest
discriminant score. The program adjusts the validation thresholds for
discriminant score until it meets the %FDR that you typed.
- Local FDR - Type a number for the %FDR that is acceptable
for your study. In this mode, the software calculates a local peptide
FDR, which it obtains from a curve that it fits to the data. While the
global FDR focuses on a collection of peptides, the local FDR answers
the question, "Does this peptide identification increase the FDR? If I
validate this identification, how many additional false positives am I
likely to get?" To meet the %FDR that you typed, the program reduces
the number of peptides that it validates, by removing those where the
peptide identification is less certain.
Protein Polishing mode
In Protein Polishing mode the intention is to achieve a target protein FDR
and increase the sequence coverage of validated proteins. The first objective
is achieved by unvalidating previously validated peptides. This capability
allows you to autovalidate marginal peptides during peptide autovalidation;
yet the protein FDR is kept under control by unvalidating the marginal
peptides that cause trouble at the protein level. The second intention is
achieved by recalculating the peptide FDR only on the subset of peptides from
validated proteins. This generally results in increased sequence coverage of
the validated proteins.
- Minimum protein score: Set the
cumulative protein discriminant score that must be met for automatic
validation.
- Group proteins across all directories -
Allows peptides from multiple directories of data files to contribute
to protein score. Mark this check box if you placed your data files
from a given sample into multiple subdirectories.
- Minimum number of directories a protein group is observed in:
Set the minimum number of directories required for a protein to be
identified in order to be considered valid.
- Automatically
raise minimum protein score to yield maximum protein FDR: ___% -
Type the % FDR you do not want the program to exceed as it
automatically raises the minimum protein discriminant score.
- Peptide FDR
for validated proteins - Mark this check box and type a
percentage acceptable for your study if you want peptides to be
validated based on a global FDR for only the valid proteins. It
is analogous to the Protein details approach for Fixed Thresholds, but
based on FDR.
To Report Quality Metrics and FDR
This utility enables two functions:
- Calculation of the final FDR after all rounds of manual and auto validation have been performed
- false discovery rate (FDR) is important to measure the validity of results and is
a requirement for publication in some journals.
- Note: For any of the FDR calculations to be functional, searches
must have been performed in MS/MS Search, with the check box
for Calculate reversed database scores enabled. (This is the default setting.)
- Reporting of metrics related to the quality of peptide separation, chromatography, and mass spectrometry associated for each of the
underlying LC-MS/MS experiments. To learn more about these
metrics, refer to Rudnick PA, Clauser KR, Kilpatrick LE, et. al.,
"Performance metrics for liquid chromatography-tandem mas spectrometry
systems in proteomics analyses", Mol Cell Proteomics. 2010
Feb;9(2):225-41 http://www.ncbi.nlm.nih.gov/pubmed/19837981
To use these capabilities:
- On the Spectrum Mill home page, under Result Summary Tools, click Quality Metrics & FDR.
- Mark the check box(es) to give the results you need.
- Select the Data Directories for which you want to report FDR and search statistics. You may select one or more data
directories. They must have sequential numbers at the end. For example, the names could be Pfu-OGE-01.d, Pfu-OGE-02.d, ...
Pfu-OGE-12.d.
- Click the Report button.
Checking the Excel Export Checkbox will cause the reports to be written to the first directory selected. The report for
file-level (LC-MS/MS run) metrics will be written to a file called qualityMetricsExportFile.1.ssv. Directory-level
metrics will be written to a file called qualityMetricsExportDir.1.ssv.
Checking the box for Update Log file (2 directories up) with file level metrics will cause file-level metrics to
be appended to a pre-existing file present 2 directory-levels up from the first selected directory. This feature
was created with the intended purpose of keeping an ongoing log of quality metrics for a particular instrument. The
file to be appended to should be called qualityMetricsExportFile.Cady.ssv. (the user should alter the Cady portion of the filename
to match the relevant instrument name). If the checkbox is not visible on the form, it can be enabled for a website
via the switch variable (enableUpdateLogFileCheckbox=true) in millhtml/SM_js/SMcustomFlags.js.
The following describes the results you can show:
Yields (spectra collected, filtered, validated)
- MS/MS spectra collected: Number of MS/MS spectra in the raw data file.
- MS/MS spectra merged: Number of MS/MS spectra that result from merging by the Data Extractor
- MS/MS spectra filtered: Number of MS/MS spectra exported by the Data Extractor
program after filtering by spectral quality.
- MS/MS spectra valid: Number of MS/MS spectra for which MS/MS Search results were validated.
- Collection Yield V/C (%): Number of MS/MS spectra interpreted and validated
divided by number of MS/MS spectra collected, expressed as a percentage
- Validation Yield V/F (%): Number of MS/MS spectra interpreted and validated divided
by number of MS/MS spectra filtered, expressed as a percentage
It is typical that not all spectra
will be interpreted and validated. If your Collection Yield seems
particularly low, there may have been an unusually high number of noisy spectra
in your analysis. Perhaps you used a low threshold for data acquisition,
or maybe there was a high instrument background. In these cases, the
relative number of spectra that are picked by the Data Extractor will be low.
Both the Collection Yield and the Validation Yield will reflect to some degree how much time you spent
processing the data, via homology searches, broader databases, etc. In
general, processing is complete when sufficient information has been extracted
from the data to meet the experimental goals.
FDR Metrics (spectra, peptide, protein)
- FDR at the peptide & spectra level (from valid hits)
- FDR at the protein level
- Group proteins across all directories - When calculating the FDR,
the software allows peptides from multiple directories of data files to
contribute to the FDR for the protein. Mark this check box if you placed
your data files from a given sample into multiple subdirectories.
- Grouping method: Determines how
proteins
are grouped for the FDR calculations.
- 1 shared peptide - When at least one peptide sequence >8
residues long is contained in multiple protein entries in the
sequence database, the software groups the proteins together and
then reports the highest-scoring one and its accession number.
- 1 shared, expand subgroups - The software
initially groups the proteins as described for 1 shared peptide.
In some cases when the protein sequences are grouped in this
manner, there are distinct peptides that uniquely represent a
lower-scoring member of the group (isoforms and family members).
When you choose 1 shared peptide, expand subgroups, more than one
member of the group is reported and counted towards the total
number of proteins.
Precursor Ion Metrics
- Precursor mass error mean (ppm) - Gives the precursor mass error
(in ppm), mean and standard deviation for validated spectra. These values
are useful for tracking the stability of mass calibration across a set of
LC-MS/MS experiments
- Precursor charge count (from valid spectra) - Gives the number and percent of
validated spectra for each precursor charge. These values can be useful for troubleshooting unexpected
variance in digestion completeness, peptide fractionation steps employed prior to
LC-MS/MS runs, data dependent acquisition settings, autovalidation settings,
or ion source performance.
- Precursor Isolation Purity & Averagine Chi2 - A measure of
whether only a single precursor was isolated. Poor quality is defined as
less than 0.85 Chi-squared versus averagine. Chi-squared is a measure of
similarity and averagine is the mass distribution you get if you assume
that the peptide is made up of "average" amino acids.
The elemental composition of for averagine is:
C 4.9384 H 7.7583 N 1.3577 O 1.4773 S 0.0417
(Senko et al, J Am Soc MS 1995 pp. 229-233)
- Precursor Acquisition Uncertainty: m/z and z - Reports the number of MS/MS spectra acquired
without being assigned a precursor charge by the acquisition control
software, and the number of spectra for which the precursor m/z was
adjusted post-acquisition by the Spectrum Mill extractor by more than +/-
0.2 m/z.
- Precursor Ion Fragmentation Table - Reports several metrics about the extent of fragmentation
of PSMs in a dataset. This report was developed with the primary intent of helping to optimize the collision
energy setting on Thermo fisher Orbitrap instruments for TMT and iTRAQ labeled datasets. The
following metrics are calculated separately for each precursor charge state and number of labels/peptide:
MS/MS Interpretation Metrics
- Identification Scores - Reports the Median ID
Score and the Median SPI(%).
- Fragmentation Mode – Gives the percentage of validated MS/MS spectra resulting from each of the
fragmentation modes that may have been employed in the LC-MS/MS run (CID,
ETD, HCD, etc.)
- Variable modification site localization - Reports
metrics associated with variable modification site localization.
Select
the type of modifications from the list.
- Identifiable Spectra, Max tag length - Reports all identifiable spectra with a Maximum tag length (MTL) greater
than the indicated value.
MS/MS Spectral Identifiability Metrics
With thresholds for MS/MS Spectral Quality Filtering several subsets of spectra are created and
used to calculate several metrics to help understand the identifiability of a dataset. The metrics attempt to measure
what portion of the dataset was good quality spectra, what portion of those good spectra became valid identifications,
what portion of those good spectra remain to be interpreted, and the relative distribution of spectral quality in each of
those portions. The spectral quality thresholds allow the user to craft the definition of "good".
If lots of good spectra are unidentified then one should consider possible causes like problems with cysteine alkylation chemistry,
contaminant proteins present that are not in the database, non-specific proteolysis in the sample prior to digestion,
and significant presence of unanticipated modifications.
Metrics reported:
- Premium Identifiable, I - The total number of filtered spectra, F, passing the spectral quality thresholds.
- Valid Premium Identifiable
- VI - The total number of valid spectra passing the spectral quality thresholds.
- VI/V(%) - VI as a percentage of the total number of valid spectra.
- Not Valid Premium Identifiable
- NVI - The total number of valid spectra passing the spectral quality thresholds.
- NVI/I(%) - NVI as a percentage of the total number of identifiable spectra.
- Sequence Tag Length (STL) Histograms for the various sets of spectra NVI, VI, I and NV, V, F. For each set of
spectra a histogram is constructed with bins for sequence tag length, and each bin counts the number of spectra
with that sequence tag length. The histograms are then converted to simple numerical representations by normalizing
the counts in each bin to the highest bin in corresponding primary histogram, I for (NVI, VI, I), and F for (NV, V, F).
The highest count is given a value of 9, and all other bins are scaled proportionally from 0 to 9, and rounded to
the nearest integer. These normalized values then consitute a number that when read left to right
is in descending order of sequence tag length. Consequently, these numerical representations of histograms can
be put in a tabular display and when the numerical histograms for multiple subsets of spectra are stacked it is
convenient to to see the relative distributions of spectral quality between the subsets. When reading a
normalized numerical histogram, the bins in sequence tag length order are 54321.0.
Example 1: A dataset that is thoroughly identified.
The quality metrics sequence tag length threshold was > 3. The Data Extractor STL filter was >0.
STL Histogram
NVI
VI
I | STL Histogram
NV
V
F |
|---|
111000.0
11223568000.0
11224579000.0
|
123331.0
1122456630.0
1123478962.0
|
- 4 is most common sequence tag length in the identifiable spectra set, I. 4th position to the left of the decimal point in the I histogram has a value of 9.
- 8/9 of the identifiable spectra with STL 4 were validated. 4th position in the VI histogram has a value of 8.
- 1/9 of the identifiable spectra with STL 4 were not validated. 4th position in the NVI histogram has a value of 1.
- 3 is most common sequence tag length in the filtered spectra set, F. 3rd position in the F histogram has a value of 9.
- 6/9 of the filtered spectra with STL 3 were validated. 3rd position in the V histogram has a value of 6.
- 3/9 of the filtered spectra with STL 3 were not validated. 3rd position in the NV histogram has a value of 3.
- Nearly all the spectra with STL > 7 were validated. Same values in positions 8 to 11 of VI and I histograms,
and positions 8-10 of V and F histograms.
Example 2: A dataset with lots of high quality unidentified spectra.
The quality metrics sequence tag length threshold was > 3. The Data Extractor STL filter was >0.
STL Histogram
NVI
VI
I | STL Histogram
NV
V
F |
|---|
1123576000.0
1123322000.0
11246898000.0
|
123668742.0
112221100.0
1235789842.0
|
- 5 is most common sequence tag length in the identifiable spectra set, I. 5th position to the left of the decimal point in the I histogram has a value of 9.
- 2/9 of the identifiable spectra with STL 5 were validated. 5th position in the VI histogram has a value of 2.
- 7/9 of the identifiable spectra with STL 5 were not validated. 5th position in the NVI histogram has a value of 7.
- 4 is most common sequence tag length in the filtered spectra set, F. 4th position in the F histogram has a value of 9.
- 1/9 of the filtered spectra with STL 4 were validated. 4th position in the V histogram has a value of 1.
- 8/9 of the filtered spectra with STL 4 were not validated. 4th position in the NV histogram has a value of 8.
- 3/6 of the identifiable spectra with STL 7 were validated. Ratio of values in position 7 of VI and I histograms.
- 2/5 of the filtered spectra with STL 7 were validated. Ratio of values in position 7 of V and F histograms.
Peptide Separation Metrics
- Chromatography metrics for each run – Gives several metrics for measuring the quality of the
chromatography and associated MS data collection. For highest utility, the
metrics should be calculated to encompass the continuous middle retention time portion of
the elution profile. A value of 80% helps to exclude discontinuous bursts
of peptides that elute at the beginning of the run because they are unretained
on the column.
Practical Uses:
- The reported values for start time, end time and span of the middle portion of the gradient help
measure the overall efficiency of the method and dead volume
incorporated into the column plumbing.
- The gradient shapes help measure the distribution of peptide abundances across the gradient and can be used to troubleshoot
gradient delivery by the LC pumps, autosampler sample loop filling/washing, and recovery of peptides from sample handling manipulations.
- Peak width in seconds helps measure the chromatographic resolution of the column packing material
and acetonitrile gradient.
- Median MS1 intensity Trigger Apex helps optimize the acquisition method so
that MS/MS spectra are selected closer to the peak apex on average,
leading to shorter acquisition times for MS/MS and more peptides
identified during the run.
- The median and max fill time metrics help optimize data acquisition methods and measure mass spectrometer sensitivity.
Metrics reported:
- Start time mid xx% matched spectra in run (min) - mid xx% means the
percentage of spectra in the middle portion of the chromatographic range; for
example, if 10,000 MS/MS spectra gave IDs in the run, the mid 80% of
matched spectra are those between #1001 and #9000 after sorting the spectra by retention time; for this metric
Spectrum Mill reports the retention time for #1001. We use this
example for each of the metrics described below.
- End time mid xx% matched spectra in run (min) - the retention time for #9000 in our example
- Time span mid xx% matched spectra in run (min) - the time range between the retention time for #1001 and that for #9000
- Gradient Shape mid xx% filtered spectra in run - To measure the distribution of peptide abundances across the gradient, this metric
attempts to provide a numeric representation of the shape of MS1 Total Ion Chromatogram using the XIC's of all precursor ions which yielded
MS/MS spectra passing the spectral quality filtering done with the Data Extractor. To due this a histogram is constructed by spliting
the time span of the mid xx% matched spectra into 7 equal time bins. The precursor intensity in each bin is summed up. The histogram
is then converted to simple numerical representations by normalizing the intensity in each bin to the highest bin. The highest intensity
is given a value of 9, and all other bins are scaled proportionally from 0 to 9, and rounded to the nearest integer. These normalized values
then consitute a number that when read left to right is in retention time order.
- Example 1: 9999999 ideal gradient, peptides evenly distributed
- Example 2: 8999751 diminished late-eluting hydrophobic peptides
- Example 3: 1359988 diminished early-eluting hydrophilic peptides
- Gradient Shape mid xx% matched spectra in run - same as above, exept histogram constructed using only the precursor ion XIC's of valid MS/MS spectra.
- Median MS1 peak width mid xx% matched spectra (sec) - average chromatographic
peak width of the precursor ion chromatograms that gave rise to the subset of the middle 8,000 matches with a precursor ion Chi2 metric > 0.85
- Total precursor XIC mid xx% matched spectra in run - total abundance for 8000 precursor XICs
- Median MS1 intensity Trigger Apex mid xx% matched spectra (%) - On average for
the 8000 identified peptides, the ratio (in percent) of the precursor ion abundance in the MS1 spectrum which triggered acquisition of its MS/MS spectrum
to the abundance of the precursor ion in the MS1 spectrum at the ion's chomatographic apex.
- Median MS2 fill time mid xx% matched spectra(msec) - the median ion fill time of the valid MS/MS spectra.
- Max MS2 fill time mid xx% matched spectra(msec) - the maximum ion fill time of the valid MS/MS spectra.
- Spectra Reaching max MS2 fill time mid xx% matched spectra(%) - proportion of the valid MS/MS which had a maximum ion fill time.
- Spectra Reaching max MS2 fill time mid xx% filtered spectra(%) - proportion of the filtered MS/MS which had a maximum ion fill time.
- Peptide pI median for each run – Gives the calculated isoelectric point median and
standard deviation for the reported number of distinct peptides in the validated
spectra for each LC-MS/MS experiment. These values are useful for measuring
the effectiveness OFFGEL electrophoresis (OGE) or isoelectric
focusing (IEF) separations that may have been performed prior to the
LC-MS/MS runs.
- RT scatter plot & peptide subset reports for each directory (seqdb/peptideQMlists/*.txt)
- This checkbox triggers two actions.
-
A distinct peptide report will be created in each directory for the subset of validated peptides that are observed in
the data for that directory that are also contained on 1 of the lists stored in the files seqdb/peptideQMlists/*.txt.
-
A file called scatter.html will also be generated in each directory that contains an interactive plot comparing
the retention times of the observed subset of peptides to a gold standard report
(goldStandardDir/Selected_peptides_all_sequences_peptideExport.1.ssv). The string goldStandardDir
is currently hardcoded in the file millpy/SM_Select_Peptide_QM_ScatterPlot.py. A future revision of this
feature should allow for a user-specified comparator source. The plot is generated from a python script
that uses the Bokeh interactive visualization JavaScript library, https://docs.bokeh.org/en/latest/.
If the checkbox is not visible on the form, it can be enabled for a website via the switch
variable (enableRTscatterPlotPeptideSubsetsCheckbox=true) in millhtml/SM_js/SMcustomFlags.js.
Sample Handling Metrics
- Isobaric label incorporation for each run - metrics associated with iTRAQ and TMT experiments. The metrics are intended to
measure several characteristics related to quantifiability, labeling completeness, mixing balance, and reporter ion sensitivity.
Select the type of isobaric label and the control ion used. The metrics include:
- Metrics for quantifiability of PSMs and the completeness of labeling as percentages of either the number of
MS/MS PSMs(spectra) or MS1 precursor intensity of all PSMs include the following:
- Labeled (%) - PSMs that contain at least 1 label and thus can potentially be used for quantitation.
- Fully Labeled (%) - PSMs with an N-terminal label and a label on Lys (if present).
Excludes peptides with labeled lysines that also have N-termini blocked by acetyl or pyro.
- No Label (%) - PSMs containing no label.
This can also include peptides with a blocked N-term (acetyl, carbamyl, pyro-Glu, etc..) ending in Arg.
This can also include contaminants added to a sample after labeling.
- Partially Labeled (%) - Only N-term Under-labeled(%) + Only Lys Under-labeled N-term(%).
- Completely Labeled (%) - PSMs with a label on N-termini (if not blocked by acetyl or pyro) and a label on Lys (if present).
Includes peptides with labeled lysines that also have N-termini blocked by acetyl or pyro.
100 - Partially Labeled(%) - No Label(%)
- Only Lys Label (%) - PSMs with a label on lysines but lacking a label on the peptide N-term.
This can also include peptides with a blocked n-term (acetyl, carbamyl, pyro-Glu, etc..) ending in Lys.
- Only N-term Under-labeled Lys(%) - PSMs with a label on the peptide N-term but lacking a label on a lysine.
- Only Lys Under-labeled N-term (%) - PSMs with a label on lysine but an unlabeled peptide N-term amine.
- No Label Under-labeled both(%) - PSMs containing no label with both an unlabeled lysine and an unlabeled peptide N-term amine.
This can also include contaminants added to a sample after labeling.
- Total Under-labeled(%) - PSMs containing containing 1 or more unlabeled sites, that could be labeled. This metric is intended to be the primary metric
guiding decisions about the potential gain from repeating the labeling of a sample.
Notes:
- 1 is a measure of the quantifiability of the dataset as a whole.
- The sum of 1 and 3 should be 100%.
- The sum of 2-3 and 6-7 should be 100%.
- The total underlabeled (10) is the sum of 7-9.
Note that 1 is a measure of the quantifiability of the dataset as a whole. The sum of 2 thru 5 should be 100%. The sum of 1 and 3 should be 100%.
The total underlabeled (8) is the sum of 5-7.
- Metrics for reporter ion ratios vs retention time as charts and tables are created if Chromatography metrics are also enabled. These are at the
level of individual LC-MS/MS run or aggregated for all runs in a directory. The 4 resulting files are charts (.PDF) or tables (.tsv).
- RIratioGradient_run
- RIratioGradient_dir
- Metrics for mixing balance amongst the various reporter ions is measured based on 3 sets of metrics:
- Reporter ion intensity (1 column / channel) - a column contains the sum of the intensity for a single reporter ion across all PSMs
in a run or in a directory.
- % of reporter ion / base reporter ion using the summed intensities of each reporter ion across all PSMs in a run or in a directory.
These metrics provides a range of the mixing balance of the combined samples relative to the most abundant component.
- Ratio reporter ion / control ion using the summed of intensities of each reporter ion across all PSMs in a run or in a directory.
These metrics provides a range of the mixing balance of the combined samples relative to the denominator intended to be used for quantitative ratios.
- Metrics for reporter ion sensitivity include the following:
- All Reporters Detected Spectra (%) - percentage of PSMs detected which contain all reporter ions for the selected labeling chemistry.
- Control Ion Detected Spectra (%) - percentage of PSMs with the control ion detected.
- Median S/N All Reporters - the median signa/noise ratio of the peaks in the reporter ion region is calculated for each PSM, followed by a
median calculated across all PSMs in a run or in a directory.
- Digestion completeness - Reports metrics associated with enzymatic digestion during sample preparation.
- Observed modifications by - Reports metrics associated with
modifications. Marking this check box enables the Distinct peptides and Peptide Spectrum Matches selections.
Peptide Fraction Overlap
- Distinct Peptide Fraction Overlap Table
- Select the Distinct peptide comparison method:
For fraction overlap, sample handling, or pI, choose Case Sensitive(CS) or
Case Insensitive(CI).
FDR calculations always use CI.
Filtering to distinct peptides retains each highest scoring representative
after CS or CI string comparison of sequences. Variable modifications are lowercase.
- Case Sensitive(CS)
Peptides with variable modifications are treated as being different from the unmodified form.
- Case Insensitive(CI)
Peptides with variable modifications are treated as being the same as the unmodified form.
Protein/Peptide Review of MS/MS Search
Results
The
Spectrum Mill provides a means for summarizing the
results to answer questions like:
- What peptides are in my sample?
- What phosphosites are in my sample?
- What proteins are in my sample?
- How well was my mixture of peptides/proteins fractionated
in my offline separation scheme?
- What trends in protein presence/abundance are there across
several LC-MS/MS runs?
- What are the quantitative differences in proteins and phosphosites across the cohort of patients in my TMT data set?
- What single amino acid variant or spliceform containing peptides were observed across the cohort of patients in my TMT data set?
Summary Modes:
See Chapter 2 of the Application Guide for detailed descriptions of
the current Protein/Peptide Summary displays.
| Mode |
Description |
Manual
Validation
State
Assignment
Available |
Example Applications |
| Peptide - Spectrum Match |
Peptides listed for each spectrum with links to data. |
yes |
List of PSMs present in the data. |
| Peptide - Distinct |
Peptide is the primary organizing feature. PSMs for the same peptide are collapsed into a single row. The menu Filter to distinct
peptides enables refining the notion of sameness to suit one's need (modified or not, different precursor charge, different LC-MS/MS run). |
no |
List of distinct peptides present in the data. Primary reporting mode for immunopeptidome experiments. |
| Protein Summary Details |
Protein is the primary organizing feature. Peptides listed
for each protein with links to spectra. |
yes |
Sequencing of simple mixtures of proteins, where coverage inspection is valuable. |
| Protein - Protein Comparison |
Protein is the primary organizing feature. Each protein is
listed once. Columns then show distribution of that protein among
samples (one LC-MS/MS file per column, or a directory full of LC-MS/MS
files treated as one column). |
no |
Primary reporting mode for quantitative whole proteome experiments. One or many
LC-MS/MS files analyzed in a single directory. Directory corresponds to
a sample. |
| Protein - Peptide Comparison |
Peptide is the primary organizing feature. PSMs for the same peptide are collapsed into a single row. Peptides that
belong to same protein group are clustered then listed in rows below each protein. The protein grouping method should be set to
unexpand subgroups to prevent a peptide from being repeated for each protein subgroup in which it is a member. Columns then show distribution of each peptide among samples
(one LC-MS/MS file or sample directory per column). |
no |
Evaluation of fractionation scheme. |
| Protein - Var Mod Site Comparison |
VM site is the primary organizing feature. PSMs for the same variable modification site are collapsed into a single row. The type of VM site (phospho, acetyl, ubiquityl) is controlled by setting the coresponding value on the required AAs menu value (s|t|y, k, k). The protein grouping method should be set to
unexpand subgroups to prevent a VM site from being repeated for each protein subgroup in which it is a member. Columns then show distribution of each VM site among samples
(one LC-MS/MS file or sample directory per column).
|
no |
Primary reporting mode for quantitative phosphoproteome, acetylome, ubuiqitylome experiments. |
| Protein - Prot Genom Site Comparison |
PG site is the primary organizing feature. PSMs for the same proteogenomic site are collapsed into a single row. The type of PG site (variant or splice junction) is controlled by setting the coresponding value on the Filter by Proteogenomic Features menu value. The protein grouping method should be set to
unexpand subgroups to prevent a PG site from being repeated for each subgroup in which it is a member. Columns then show distribution of each PG site among samples
(one LC-MS/MS file or sample directory per column). This mode is critically dependent on the prior
creation of summary tables for personalized sequence databases used for the MS/MS searches.
|
no |
Primary reporting mode for focusing on personalized proteogenomic features observed within a whole proteome experiment. |
Protein Grouping in Protein Modes
The mechanism consists of the following steps:
- Extract peptides - From each search result, extract all of
the rank 1 hits (may be multiple instances of the same peptide sequence
matched to proteins with different accession numbers).
- Form proteins - Assemble all the peptides belonging to a
single accession number.
- Eliminate peptide redundancy - Redundancy has several
sources:
- Spectra acquired on multiple charge states of the same peptide
- Multiple spectra acquired from a single precursor m/z
- Multiple homology matches to the same peptide in a single
protein (i.e. the peptide sequence can be ambiguously interpreted by
different AA substitutions)
The protein score and the number of distinct peptides are
calculated so that only the instance of a particular peptide with the
highest MS/MS Search score is counted (i.e. each peptide counted once,
NOT multiple spectra, NOT multiple charge states, NOT multiple
substitutions). The protein score is the sum of the identification scores
of the distinct peptides from that protein. However, the total intensity is summed so that each
observation of a peptide counts towards the total intensity for the
protein (i.e. each spectrum counted once).
- Eliminate protein redundancy - Proteins are grouped by
peptide roll-up. All proteins are sorted in descending order of number
of distinct peptides. Then starting from the bottom protein, the
question is asked: for this protein, is at least one of the observed
peptides present in a protein higher on the list? If so, the proteins
are grouped together when a peptide sequence of >8 residues is contained
in multiple protein entries in the sequence database.
In some cases when the protein sequences are grouped in this manner,
there are distinct peptides that uniquely represent a lower-scoring
member of the group (isoforms and family members). Each of these instances spawns a subgroup.
Multiple subgroups are reported and counted towards the total number of proteins,
and given related protein subgroup numbers (e.g. 3.1 and 3.2 for group 3, subgroups 1 and 2). See also the information
about multiple sequence alignment. In the Protein Summary Modes, the
highest-scoring member of each protein group and subgroup become the basis for
further calculations. All subgroups are reported in Protein/Peptide Summary, unless
the protein grouping method is set to Unexpand subgroups.
- Expand subgroups and shared peptides - When reporting the protein score, summed precursor intensity
and quantitative ratios there are multiple possible ways of handling the peptides which are shared by more than 1
subgroup in a protein group. 4 options are provided:
- unexpand subgroups
all peptides are used and protein group level values are reported without expanding into subgroups. For certain modes
which display peptide level results (Protein - Peptide, Protein - Var Mod Site, Protein - Prot Genom Site) this method is
valuable to prevent peptides, VM sites, and PG sites from being reported multiple times i.e. for each subgroup they are
members of. When doing so, the highest scoring protein subgroup they are members of will be reported.
- expand subgroups, all use shared
Shared peptides are used in each subgroup in which they are observed. This is the default approach.
- expand subgroups, top uses shared, SGT
Shared peptides are used only in the top scoring subgroup. They are excluded from other
subgroups. For isoforms and family members, this method is valuable for having quantitation based solely on the peptides which are distinct
to that subgroup. The report filename will contain a .SGT. designation intended to mean SubGroup Top.
- expand subgroups, ignore shared, SGS
Shared peptides are ignored for all subgroups. Only the subgroup specific peptides are used toward each subgroup’s
count of distinct peptides and protein level quantitation. This method is particularly suited for xenograft experiments
(a human tumor grown in a mouse). If evidence for BOTH human and mouse peptides from
an orthologous protein were observed, then peptides that cannot distinguish the two (shared) are ignored.
However, the peptides shared between species are retained if there was specific evidence for only one of the
species, thus yielding a single subgroup attributed to only the single species consistent with the specific
peptides. Furthermore, if all peptides observed for a protein group are shared between species, thus
yielding a single subgroup composed of indistinguishable species, then all peptides are retained.
The report filename will contain a .SGS. designation intended to mean SubGroup Specific.
In some applications it is helpful to consider more than one method of handling the shared peptides. Consequently, instead of
a user having to generate multiple reports (and wait for the protein grouping to be repeated), when either the SGS or SGT option is selected
a second report for the all use shared option is generated when the excel export option is used for producing output.
- Sort protein groups and subgroups - Protein groups are sorted in descending
order of protein score. Subgroups within a group are sorted in descending
order of protein score that includes the peptides that are shared with other
subgroups.
Notes:
- The modes Protein - Var Mod Site Comparison and Protein - Peptide Comparison
- should be used with the protein grouping method set to Unexpand subgroups
to prevent VM sites and peptides from being reported multiple times i.e. for each subgroup
they are members of. When doing so, the highest scoring protein subgroup
they are members of will be reported.
- In Protein Summary Details mode - When you use manual validation
with 1 shared peptide, expand subgroups, the top portion of the
report that lists the proteins shows the individual subgroups. The
lower peptide portion of the report shows all the peptides that belong
to the group; subgroup information is not given at the peptide level.
Because a peptide can belong to more than one subgroup, this prevents
you from assigning conflicting validation states to a single peptide
that is listed multiple times in different subgroups.
For a discussion of the principles of protein grouping, see:
Nesvizhskii, A. I.; Aebersold, R.; "Interpretation of Shotgun
Proteomic Data: The Protein Inference Problem;" Mol. Cell Proteomics.;
2005; 4(10);1419-40 DOI:
10.1074/mcpR500012-MCP200
Peptide Validation
The Spectrum Mill provides a means for segregating search
results that contain a valid interpretation of an MS/MS spectrum from
those which do not. The segregated groups can then be subjected to
subsequent rounds of searches (against other databases or in homology
mode for example) or to produce a summarized list of only those
peptides or proteins found in a sample from confidently-interpreted
spectra. An interpretation which is not valid can result from several
causes:
- Sequence not in database
- Marginal spectral quality
- Incorrect precursor charge designation (mostly likely resulting
from inadequate instrument resolution on the precursor ion)
- Incorrect search parameter settings (mass accuracy, fragment ion
types, enzyme, cysteine modification, etc ...)
- Search algorithm or peak selection in need of improvement
To segregate the search results, the software must keep track of
both the spectrum and its interpretation in a coordinated way. The
software must simultaneously keep track of spectra separately from
search results, since spectra can be segregated according to quality
without regard to their interpretations. The validation state of a
particular spectrum or a search result can be designated with certain
programs. After toggling the validation state for each search result or
spectrum and clicking the perform validation button, two files are
created in the appropriate data directory (hitTable.tsv, and spectrumTable.tsv).
The tables record the appropriate state of search result or spectrum
file according to the chart below. Files whose state is not designated
are not recorded in the tables. When additional validation events are
performed, the table files cumulatively record the validation states of
spectra and search results for the particular data directory.
Subsequent operations using different programs can thus be done using
only the members of the group corresponding to combinations of states.
Subsequent MS/MS searches will overwrite the results of earlier
searches.
| Validation Filter |
Program Using Filter |
Possible
Spectrum States |
Possible
Interpretation (Hit)
States |
Program Capable
of Assigning
Spectrum States |
Program Capable
of Assigning
Interpretation (Hit) States |
| spectrum-not-marked-sequence-not-validated |
MS/MS Search
de novo Sequencing
Spectrum Summary |
none |
none |
Protein/Peptide Summary
Spectrum Summary |
Protein/Peptide Summary |
| sequence-not-validated |
Protein/Peptide Summary
MRM Selector |
none
good
bad |
none |
Protein/Peptide Summary
Spectrum Summary |
Protein/Peptide Summary |
| valid |
MS/MS Search
Protein/Peptide Summary
MRM Selector |
valid |
valid |
Protein/Peptide Summary
Autovalidation |
Protein/Peptide Summary
Autovalidation |
| good-spectrum-sequence-not-validated |
MS/MS Search
de novo Sequencing
Protein/Peptide Summary
Spectrum Summary
MRM Selector |
good |
none |
Spectrum Summary |
Protein/Peptide Summary |
| good-spectrum |
Spectrum Summary |
good |
none
valid |
Spectrum Summary |
Protein/Peptide Summary
Autovalidation |
| bad-spectrum |
Spectrum Summary |
bad |
none
valid |
Spectrum Summary |
Protein/Peptide Summary
Autovalidation |
| all |
Protein/Peptide Summary
MRM Selector |
none
valid
good
bad |
none
valid |
Protein/Peptide Summary
Autovalidation
Spectrum Summary |
Protein/Peptide Summary
Autovalidation |
The Spectrum Viewer is a
convenient tool for reviewing results.
To Use the Protein/Peptide Summary Form
The following topics describe options available on the
Protein/Peptide Summary form. Note that the options under Validation
and Sorting and Review Fields change depending upon which Mode
you select. This section describes all possible options; you may
see only a subset of these on your form.
If during data review you wish to display the Protein/Peptide
Summary form again, click the Summary Settings button at the
top of the page.
For more details, see Protein/Peptide
Review of MS/MS Search Results.
Summarize Results for Review
- Summarize - Click to summarize results.
Click this button after you have either loaded
the
desired parameter file or manually set the parameters. The name of the
current parameter file appears in red at the top of the form. Once you
have saved a parameter file from this form, you may do the summary from
a workflow rather than manually with the
Summarize button.
- Save As - Click to save current
summary settings in a parameter file.
- Load - Click to load a parameter
file
that contains summary settings. For default values, select a parameter file from
the Defaults folder.
- Queue request - Mark this check box
if
you want the data summary to occur after completion of a queued MS/MS
search and a queued autovalidation for the selected data directories.
That is, mark the check box if you want to do
interactive automation.
If you want to see summary results immediately, clear the check box.
You also mark this check box if you want to preserve the output in HTML
format for later access.
Note: When you view Protein/Peptide Summary results from the
Completion Log, some links do not work as they would if they were
viewed within the Protein/Peptide Summary page. For example, you cannot
click the Row# link to view and review spectra. Most links do
work, but they display their output in a separate window.
- Excel export - Mark or select to export
results to Excel or to upload to LIMS. For the latter,
first make sure your system administrator has configured the
upload. See Exporting to Excel
or Uploading to LIMS. This setting appears only for some of the display
modes.
- MPP Generic export - Select to export
results to MPP (Mass Profiler Professional) generic import format.
The MPP Generic export is only available in the Protein-Protein Comparison mode.
If you want all proteins reported without grouping, use the Protein-Protein Comparison
mode with 1 shared, expand subgroups selected as the Protein grouping method.
- MPP APR export - Select to export
Agilent Proteomics Results (APR) to Agilent Mass Profiler Professional (MPP)
14.0. If you have not updated to MPP 14.0, continue to use the MPP Generic
export (which also supports non-Agilent data). The APR format provides both
Protein and Peptide results that you can import into MPP’s “Proteomics”
experiment type. The format organizes results by proteins with their
corresponding peptides. (See the MPP documentation for details). When you
select MPP APR export, the program exports all the
necessary protein and peptide information, whether or not the review fields
are selected. The exception is labeled quantitation. For DEQ/SILAC,
select the DEQ ratios and the Invert setting if applicable. For iTRAQ/TMT, select
the Reporter Ratios, the type of modification, and the
Control ion. Note that the abundance values are
exported for each labeled modification rather than the ratios, but enabling the
ratio calculation allows the labeled abundances to be determined and
the controls to be specified. Peptides that do not have the labeled
modification are not exported. For duplicate peptide hits (same
sequence, modification, and charge), only the most abundant peptide is
exported for that protein. All other protein and peptide filtering options
and the Protein Quantitation Options are applied, so you
can filter and limit what is exported.
- AMRT export
- Mark to export results to a CSV file that you can search directly or
import into an existing Agilent MassHunter accurate mass retention time
(AMRT) database. (See the MassHunter
Personal Compound Database and Library Quick Start Guide for import
instructions.)
- You can then search this database from
MassHunter Qualitative Analysis or MassHunter ID Browser, to map
features to identifications from Spectrum Mill.
- You can then import the results from the
AMRT database search into MassHunter Mass Profiler Professional, which
transfers the identifications into Mass Profiler and annotates the
features. Mass
Profiler and Mass Profiler Professional can then make use of ID Browser
to search the AMRT database to provide annotations for the features in
these programs.
- AMRT export also exports neutral mass
formulas for use with Find by Formula in MassHunter Qualitave Analysis.
- The AMRT CSV export setting
appears only for the peptide display mode, and you can mark the box
only if you have not marked Excel export.
- This function only exports the most
abundant peptide if there are more than one of the same sequence.
And it exports intensity as "Area" column.
- The CSV file is named peptideExport.#.amrt.csv, and
the program stores it in the data file
folder. If you generate a CSV file from multiple data folders, the
program stores the file in the first data folder that you selected.
- Export inclusion list for top peptides/protein - Mark this check box to create an inclusion list for Agilent Q-TOF instruments.
Enter a value for the maximum number of peptides to target per protein.
(This feature is only available if Agilent Q-TOF data has been selected.)
- Mode - Select a summary mode. For more details, see Summary
Modes.
- Filter to distinct peptides -
To report only the instance of a particular peptide with
the highest MS/MS Search score, select one of the following:
- Off -- Disables the filtering.
- Case insensitive -- When collapsing to "distinct", a case-insensitive string compare is used, thus peptides with variable modifications (lowercase AA's) and unmodified peptides are combined.
- Case sensitive -- When collapsing to "distinct", a case-sensitive string compare is used, thus peptides with variable modifications (lowercase AA's), different localizations of those variable modifications, and unmodified peptides are kept separate.
- Charge file CS -- When collapsing to "distinct", a case-sensitive string compare is applied to both the sequence and spectrum filename prefix, thus peptides from different LC-MS/MS runs and those with different precursor charges are kept separate.
This option is available only in Peptide - Distinct mode.
- Group results by: Select
File to display results by file or
Directory to display results by
directory. The latter is useful if you want to compare multiple
samples, and each sample is located in a separate directory on the
Spectrum Mill server. Note that this option is available only in
certain display modes.
The Protein-Peptide Comparison Columns mode allows rows to be grouped by
Sequence or Var mod site.
- Data directories - Click the Select ... button to
select a data directory or data directories. See
Selecting Data Directories.
- Search result files: Modify this list if you want
to summarize only a subset of the files in the data directory.
Wildcards (*) are supported. To see the names of your search
result files, look in the results_mstag subdirectory under the
directory where you placed your raw files.
- Search result files exclude: Modify
this list if you want to exclude certain files from the summary.
Wildcards (*) are supported.
Validation and Sorting
- Filter results by: See Peptide
Validation.
- Validation preset: Used during results review, and
determines whether results are initially classified as status, valid,
reset, or none.
- Choose none if you want to summarize results rather
than review and validate results.
- Choose valid if you want to validate results and you
set filters to select results with relatively high protein and/or
peptide scores.
- Choose reset if you want to validate results and you
set filters to select results with medium protein and/or peptide
scores. You can change to valid when you find acceptable
results as you manually review data. The validation preset
classifications are not yet written to file and can easily be changed
as data are reviewed.
- Choose status if you want to see all peptides that
belong to a protein, regardless of validation state. To generate such a
display, set Filter results by: to all and set Mode
to one of the display modes that show both proteins and peptides. When
the data are displayed, look under Validation category to see
if a particular peptide was validated (V) or not validated (R,
for reset). You may also change the validation state, but before you
exit the form, be sure to click the Perform Validation button
to save the new validation state.
- Protein grouping method: Options for how
proteins are grouped based on shared/distinct peptides
and which peptides contribute to protein-level quantitation.
- Sort proteins by: Determines how proteins are sorted in
the results summary.
- Filter by protein score: Permits display of only
proteins matching specified score criteria. Note that protein
scores of 25 and greater are almost certain to represent valid results.
- Sort peptides by: Determines how peptides are sorted
in the results summary. Select the
appropriate Review Field from the list. Note that when you sort
by accession number, the sort is alphabetical rather than numerical.
This is because some databases do not have strictly numeric accession
numbers.
- Filter peptides by: Permits display of only peptides that
match specified criteria.
- Score: Filters by database search score. Note that
peptide scores of 15 or greater, in combination with % SPI of 70 or
greater, are almost certain to represent valid results. Peptide
scores less than 6 seldom represent valid interpretations unless the
spectra originated with an instrument capable of accurate mass
measurements (e.g., Agilent Q-TOF). For Agilent Q-TOF data, you search
with a narrower mass tolerance, so there is a better chance that
lower-scoring results are valid. It is not unusual for a score of 5 to
represent a valid result, but only if the peptide is short or in low
abundance.
- % SPI: Filters by percent scored peak intensity.
This is the percentage of the spectral peak-detected ion current
explained by the search interpretation.
- Required AAs: Filters search results so that peptides
are shown only if they contain the required amino acid(s). To disable,
select any. See Amino Acid
Filtering.
- Disallowed AAs: Filters search results so that peptides
are not shown if they contain disallowed amino acid(s). To
disable, select none. See Amino
Acid Filtering.
- Peptide pI: Filters search results by peptide pI. Fill
in a range, or mark the check box for All. The software
displays this filter only when you mark the check box for Peptide pI
under Review Fields. If you wish to use the pI filter for
modified peptides, ask your server administrator to first verify that
the pK of the modified amino acid is specified in smconfig.std.xml
or smconfig.custom.xml. Spectrum Mill server
administrators may set the pK values for modifications when they
define modifications
(only necessary if the pK values are different from those of the
unmodified amino acid).
- Accession #'s: Filters search results by accession
numbers. You can type or paste a list of accession numbers in various
formats (space-separated, separated by ‘|’, comma-separated, etc).
Review Fields
- Filename - Spectral file name, in the format
Data_File_Name.aaaa.bbbb.c, where aaaa = first merged scan, bbbb = last
merged scan, and c = assigned precursor charge (0 means charge was ambiguous)
- Score - Database search score. Depending on display
mode, this shows either the individual peptide score or the summed
peptide scores for the protein.
-
FDR (Discriminant)
- False Discovery Rate - Displays both the global FDR and local FDR values,
as well as an FDR Search #; independent of the autovalidation strategy used
- Fwd-Rev score - Difference between scores for top hits from forward and reversed database searches.
- Rank 1-2 score - Difference between rank 1 and rank 2 database search scores
- SPI (%) - Scored peak intensity. This is the
percentage of the spectral peak-detected ion current explained by the search interpretation.
- Glyco Product Ions Score - Spectral feature based on The 9 ion glycosylation-signature set: 126,138,144,168,186,204,274,292,366.
Numerically, GPIS is a 2-part score. See CPIS & GPIS for more detail.
- Backbone Cleavage Score (BCS) - Based on the search results, the number of cleavages of the amino acid backbone that are represented in
the spectrum.
- Unmatched ions - Number of ions in the peak detected spectrum that did not match the theoretical ions predicted from the top database
search result. This is displayed in the format: # unmatched ions/ # total ions after peak detection.
- Var mod sites - Lists number and sites
of variable modifications and amino acid substitutions, primarily
phosphorylation sites but others are available, too.
- VML score - Displays the VML (Variable Modification Localization) score of the modification
selected, which is the difference in score between equivalent identified sequences with
different variable modification localizations. A VML score of >1.1
indicates confident localization. 1 implies there is a
distinguishing ion of b or y ion type. 0.1 means that when unassigned,
the peak is 10% the intensity of the base peak.
- Solution charge - Displays the predicted charge of the peptide in solution, which can
be useful for reviewing results after charge-based fractionation.
The later fractions are expected to have a higher solution charge.
- Ion mobility - Reports DT and CCS values, if present.
- Start AA position - The numerical position of the peptide's first amino acid in the sequence of the protein
- Proteogenomic feature - Enables reporting some extra columns about variant-containing or spliceform-containing peptides. This feature is
critically dependent on the prior
creation of summary tables for personalized sequence databases used for the MS/MS searches.
- Run specific -
This setting appears only in two display
modes: Protein-Protein Comparison Columns and Protein-Protein Comparison Redundant.
It allows you to add information to the
summary report. For each colored cell in a protein comparison columns
report, the results in the colored cell are specific to that column
(could be one LC-MS/MS run, or one folder or sample); that is, peptides
shared across the columns are excluded. When you have multiple runs
(folders or files), each of the first N columns (where N is the number
of runs/files/folders/samples) report values that are specific to those
runs. Further to the right are values that are summed across all
the fildes/folders (samples).
When you mark the check box for Run Specific,
you can then choose to display any combination of the following five
settings in the first column (one run) or multiple columns (multiple
runs):
- % Coverage - percent of the protein sequence covered by the identified peptides
- Distinct peptides - number of unique peptides identified
from the spectra associated with the protein. Multiple spectra may
match the same peptide; this is a count of unique peptides rather than
matched spectra.
- Distinct peptide forms/mods - number of unique peptides,
where modified peptides are also counted as unique
- DEQ ratio - displays ratios for differential expression
quantitation, such as light/heavy ratios for ICAT reagents or other
reagents that use isotopic labels.
See SILAC and Other Differential Expression Quantitation.
Also displays the number of light/heavy pairs that contribute to each ratio.
- Reporter Ratios: iTRAQn or TMTn
- displays ratios for iTRAQ or TMT quantitation.
"n" indicates the number of reporter ions in the experiment. To see the
iTRAQn or TMTn in this field, select either iTRAQ4, iTRAQ8, TMT2 or
TMT6 from the dropdown list in the right column of the Review Fields.
Also select the mass for the denominator of the ratio from the
Control dropdown list in the right
column. This field reports all the required ions.
- Sequence - Amino acid sequence of
matched peptide from database search
- b/y map - displays the amino acid
sequence of the matched peptide from the database search, annotated with the following:
- Red forward-slashes for locations of y-ions
- Blue backslashes for locations of b-ions
- Magenta pipes (vertical lines) for locations of both b- and y-ions
This functionality allows you to assess b- and y-ion coverage without
inspecting the spectrum, and for homology mode results aids in
identifying the site of a PTM by highlighting existence of surrounding
b/y ions.
- Rev Sequence - Displays (in magenta)
the score and sequence for the top hit from the reversed database search
- Rank 2 - Displays ( in green)
the score and sequence for the number 2 database hit. The SPI is also
displayed, but it retains the blue color to indicate that it is a link.
- VML sequence - Displays the actual sequence of the amino acids surrounding the variable modification site(s)
- Prec Av Chi2 - Displays the Precursor Avergine Chi2 value.
- Isol Pur - Displays the Precursor Isolation Purity.
- Ret time, width -Time (min) from the start of the LC gradient to the chromatographic apex of the precursor ion.
When multiple spectra are merged, the retention time is that for the first of the merged scans.
Width of precursor ion chromatographic peak (sec), 0 means no more than 1 MS 1 scan had a satisfactory precursor isotope cluster shape.
- Precursor m/z - Measured m/z of the precursor ion
- MH+ - Measured precursor ion MH+
- Delta mass - Difference between measured precursor MH+
(calculated from measured precursor m/z and charge state) and
precursor ion MH+ from top database search hit
- Pep pI - Calculated isoelectric point (pH at
which the net charge on the peptide is zero) of peptide that
corresponds to top database hit. When you mark this check box, the
report includes peptide pI, and you enable the capability to filter by peptide pI.
- Protein MW - Molecular weight of protein representing top database hit
- Prot pI - Isoelectric point (pH at which the net charge on the protein is zero) of protein representing top database hit.
- Species - Species for protein representing top database hit
- Accession # - Database accession number
- Protein name - Protein name for top database hit
- Intensity - In peptide summary modes, this is the peak
intensity calculated from the extracted ion chromatogram of each
peptide precursor. In protein display modes, this is the mean
intensity, total intensity, or both (depends on user selection) of the
peptides that make up the protein. For more details, see
Color-Coded Quantitation Results and the
totalIntensity topic under Spectral Features.
- DEQ ratios - Mark to display ratios for differential
expression quantitation, such as light/heavy ratios for ICAT reagents
or other reagents that use isotopic labels.
See SILAC and Other Differential Expression Quantitation.
When you mark this check box, and you have selected a protein summary mode that supports
quantitation, the program displays two an additional settings:
- Invert - Mark to display the reciprocals of the ratios
that are normally calculated, for example, to change light/heavy (L/H)
to heavy/light (H/L)
- Selection for Median, Mean, or Both
- Reporter Ratios - Mark the check box to calculate the ratios of isobaric tag masses used in quantitation.
- Intensities - Mark to display intensities for marker ion masses for peptide reports.
- Dropdown list of Reporter Ratios:
Select one of these options to change the list of Reporter Ratios available.
- iTRAQ4 - Select this quantitation option for 4 samples labeled with this tag.
- iTRAQ8 - Select this quantitation option for 8 samples labeled with this tag.
- TMT2 - Select this quantitation option for 2 samples labeled with this Tandem Mass Tag.
- TMT6 - Select this quantitation option for 6 samples labeled with this Tandem Mass Tag.
- Control - Select the isobaric tag mass you wish to use in the denominator for ratio calculations.
- Modification names - Lists modifications. Lists the site of the modification first, followed by the type of modification.
- N-term - N-terminal modifications
- C-term - C-terminal modifications
- Cysteines - Cysteine modifications
- Fragmentation mode - The MS/MS fragmentation mode for the
spectrum, either CID for collision-induced dissociation or ETD for
electron transfer dissociation
- Max tag length - Maximum sequence tag length, defined as
the length of the longest path of amino acids that is represented in
the spectrum. This is a useful measure of spectral information
content.
- Longest tag - Amino acid sequence corresponding to maximum sequence tag length
- # b/y pairs - Number of b/y pairs represented in the spectrum.
- Category: User-defined protein category.
Categories must be defined
by your system administrator and entered into an msparams_mill\categories.#.tsv
file. When you mark the Category check box, you can then select
a category.
Protein Quantitation Options
These options are available only in certain protein modes.
- Exclude poor isotope quality Precursor XIC's - Mark this
check box if you do not want quantitation to include peptides
whose isotope ratios show poor quality. Poor quality is defined as less
than 0.85 Chi-squared versus averagine. Chi-squared is a measure
of similarity and averagine is the mass distribution you get if you
assume that the peptide is made up of "average" amino acids. The
elemental composition of averagine is C 4.9384 H 7.7583 N 1.3577 O
1.4773 S 0.0417. (See Senko MW, Beu SC, McLafferty FW, "Determination
of monoisotopic masses and ion populations for large biomolecules from
resolved isotopic distributions," J Am Soc Mass Spectrom 1995,
6:229-233.) This setting applies only for Agilent Q-TOF and Thermo data
and for
protein summary modes that support quantitation.
- Exclude poor Precursor Isolation Purity < [75%]-
Mark this check box if you do not want quantitation to include
peptides whose proportion of the ion current in the isolation window of
a high resolution MS1 scan represented by the isotope cluster of
precursor ion assigned to the resulting MS/MS scan is less than 75%.
- Exclude outlier DEQ Ratios - Mark this check box if you
do not want quantitation to include DEQ ratios that are more than two
standard deviations from the mean. The program displays this setting
only in certain modes that display proteins, and then only when you
mark the check box for DEQ ratios.
Spectrum Grouping Options
These options are available only in the Protein-Peptide Comparison Columns mode.
Each precursor ion intensity reported contains the summed value from all of the
peptide spectrum matches (PSM's) that were grouped together.
- Group missed cleavages containing VM site(s) - Mark this check box to combine PSM's of the same variable modification site
with missed cleavages if they contain the same number of modifications. That is, different missed cleavage forms of peptides containing the
same modification site (AA position in the sequence) will be collapsed into a single row.
For example, for s|t|y modifications, a row in the table combines PSM's of the same s|t|y site with missed cleavages allowed so long as they all contain the same number of s|t|y modifications.
The displayed representative is the one having the highest VML score.
- Show all grouped spectra - Mark this check box to see all the PSM's that were combined.
A row in the table combines peptide spectrum matches (PSM's) of the same peptide containing the same number of the variable modifications. For example, for s|t|y modifications, a row in the table combines PSM's of the same peptide containing the same number of s|t|y modifications.
This allows one to inspect the collapsing behavior by reporting all the individual PSM's that are
collapsed to an individual sequence or VM site. Because this results in a nested table with multiple rows in individual celss,
Excel Export is not supported for this feature.
Variable Modification Localization within Protein/Peptide Summary
Variable modification localization is a unique Spectrum Mill feature that assigns
modifications to specific location(s) in a sequence when you have two or more
possibilities. In addition, it provides a confidence indicator,
which is the difference in score between equivalent identified sequences with
different variable modification localizations. A VML score:
- Greater than 1.1 indicates confident localization.
- 1 implies there is a distinguishing b or y ion.
- 0.1 means that when unassigned, the peak is less than 10% of the intensity of the base peak.
This tool saves time because you can determine modification sites without the
need to inspect the spectra. For example, with this tool, you can compare and visualize
phosphosite differences across samples. The sequence map shows the cleavage
location for the observed ions, which provides additional information on the
scoring.
Ion Mobility Workflow
The Spectrum Mill B.06.00 release provides support for Agilent IM-Q-TOF
data using concatenated peak list (PKL) files generated by the Agilent
MassHunter IM-MS Browser (B.07.02 or later). The PKL files contain the retention time (RT), drift time (DT), and
collision cross section (CCS) values. The CCS values are written only if the
data has been calibrated for the CCS calibration factors, and if the charge
state of the precursor can be determined.
The PKL file is extracted using the Generic Extractor, which writes the RT,
DT, and CCS values to the mzXML file that is generated. The IM values are
propagated into tagSummary during a search. The Protein/Peptide Summary modes
that include peptide results have an Ion mobility review field.
If marked, the summary report includes the DT and CCS values. If CCS is not
available, its value is reported as 0.0. Spectrum Summary also provides an
Ion mobility field to report these values. The MPP APR
Export (Protein-Protein Comparison summary mode) supports export of the
ion mobility values if they are present in the data.
Workflow for processing IM-Q-TOF data
The workflow described here is current as of the Spectrum Mill B.06.00 release. Contact
Agilent for possible updates to the recommended workflow.
To report CCS
values, the data must be calibrated for calculating the CCS values. The
calibration involves acquiring a tune mix that contains at least three ions with
known CCS values. The calibration is done using the IM-MS Browser, and can be
done on the acquisition system where the factors are applied to future acquired
data, or to selected data files on the analysis system. Refer to the IM-MS Browser
documentation for details.
To process IM-QTOF data:
In IM-MS Browser:
- If the data has not been calibrated for CCS, open the tune file in IM-MS
Browser, and apply CCS calibration to the data that is to be processed.
- Open the data file.
- Method->Find Features (IMFE). Select the
Peptides as the Isotope model, and set Limit
charge state to what is expected for the peptides. The Ion
intensity setting of >= 100 is a reasonable default.
- Method->Filter Features. These setting may require some experimentation,
depending upon the data. Select Max ion volume. Typical values to use are:
- Quality score from 50 to 100
- Charge state from 2 to 7
- Maximum feature count 2500
- Leave other filters unmarked.
- Method -> Extract Fragmentation Spectra… The default values (+/- 3 seconds
for RT and +/- 0.3 milliseconds for DT) are suitable.
- Method -> Find Peaks in Mass Spectrum… Only enable and set the
Maximum peak
count to be 200 peaks, and do not mark the Charge state assignment.
In the Spectrum Mill:
- Copy the PKL file generated by the IM-MS Browser to a new folder under
msdataSM on the Spectrum Mill server. Do not place it in a
cpick_in subfolder.
- In the Data Extractor, select the folder with the PKL file. It will show
the Generic Extractor parameters. Select the Instrument type to be
Agilent
ESI Q-TOF. Set the MS/MS Spectral Feature Finding parameters to correspond
to your data.
- In MS/MS Search, select the instrument to be Agilent ESI Q-TOF and
set other parameters according to how the data is to be searched.
- In Protein/Peptide Summary, the Peptide modes have an Ion
mobility review field. Mark it to report the DT and CCS values. If
the data was not calibrated for CCS, it reports “0.0” for CCS values. The
AMRT export in the Peptide – Spectrum Match and Peptide – Distinct modes
will include the DT and CCS values if the Ion mobility
review field is marked.
- To export ion mobility results to Agilent Mass Profiler Professional
(MPP) 14.8 or later, in the Protein-Protein Comparison mode of
Protein/Peptide Summary, select MPP APR Export.
Color-Coded Quantitation Results
When you mark the Intensity check box under Review Fields
on the Protein/Peptide Summary form, then the results include
color-coded information to make it easy to visualize relative
concentrations and differences in protein abundances between
samples. The color code indicates relative peptide or protein
concentrations, where darker colors (e.g., red) indicate larger
relative concentrations and lighter colors (e.g., yellow) indicate
smaller relative concentrations. Colors in between (e.g.,
orange) represent intermediate concentrations. The colors make it
easier to compare samples and quickly pick out sample differences.
Depending on the display mode you select, the color-coded results
appear in either one or two columns of the results table.
In peptide display modes, you see Spectrum Intensity, which
is the peak intensity calculated from the extracted ion chromatogram of
each peptide precursor.
In protein display modes, you see one or more of the following:
- Mean Peptide Spectral Intensity - mean intensity of all
peptides assigned to that protein. Peptide intensities are
calculated from extracted ion chromatograms from the precursor ions.
- mean intensity - same as Mean Peptide Spectral
Intensity
- Total Protein Spectral Intensity - total intensity of all
peptides assigned to that protein. Peptide intensities are
calculated from extracted ion chromatograms from the precursor ions.
- total intensity - same as Total Protein Spectral
Intensity
- Distinct Peptides (#) - number of distinct peptides
detected for each protein
- # spectra - total number of spectra, including those for
redundant peptides
Multiple Sequence Alignment Tool
within Protein/Peptide Summary
Introduction
The Multiple Sequence Alignment Tool within the Spectrum Mill
software enables alignment and comparison of the amino acid sequences
of proteins within a protein group.
The software accomplishes the alignment via a transparent interface to
Clustal W, a program that is available from the European Bioinformatics
Institute (EBI). Agilent licenses the Clustal W program, and the
Spectrum Mill installation copies it to the millbin folder on
the Spectrum Mill server. Once the program is located within millbin,
you access the alignment capability of Clustal W directly via links in
the Protein/Peptide Summary report in the Spectrum Mill. You
can also access multiple sequence alignment from a stand-alone utility
– the Multiple Sequence Aligner. For more information, please see the
help for that form.
Reference:
Chenna, R.; Sugawara, H.; Koike,T.; Lopez, R.; Gibson, T.; Higgins,
D.G.; Thompson, J. D. “Multiple Sequence Alignment with the Clustal
Series of Programs”, Nucl. Acids Res. 2003, vol. 31,
no. 13, 3497–500, PubMedID:
12824352.
Note: If the database is too large (> 4.2 Gb),
the alignment does not
work properly. In that case, create a
subset database before you do the alignment.
To Align Sequences
To access the alignment capability:
- Generate a Protein/Peptide Summary report from one of the
following summary modes:
- Protein-Protein Comparison Columns
- Protein-Protein Comparison Redundant
- Click a Group # or Subgroup # link in the
report.
- Wait a short while for the report to display.
Report Description
The top of the report provides information about the proteins in the
group, starting with the longest protein first. For each protein, the
report lists:
- ID – the accession number
- Subgroup # – number of a protein subgroup. The presence of
subgroups indicates that distinct peptides were detected for isoforms
or protein family members.
- Length – number of amino acids in the protein
- Identical AA’s – in the aligned sequences, the number of amino
acids that are identical to those in the longest protein
- %ID – the percent of matching amino acids, as given by Identical
AA’s divided by Length, expressed as a percentage
- Species – the species for the protein from the database
- Protein Name – name from protein database
The bottom of the report aligns the amino acid sequences from the
various proteins. The left column lists the protein accession numbers.
To view a protein name (as given in the protein database), rest the
mouse pointer on the accession number. The right side of the report
displays the aligned amino acid sequences. The sequences typically
occupy more than one line of text; scroll down to view subsequent
lines. Blank lines indicate the start of the next section of the
sequence. Colored highlights show the locations of supporting peptides
for each protein identification.
For more information about Clustal W and a description of the
calculations that Clustal W uses to perform the alignment, access the
online help at
EBI, or see the reference above.
Note: If you want to both align sequences and generate a
phylogenetic tree, then use the
Web form at EBI. The
phylogenetic tree is not available when you use Clustal W within the
Spectrum Mill.
Peptide Table
To view a table that lists the detected peptides that are present in
the amino acid sequence of each protein, do one of the following:
- If the mode is Protein-Protein Comparison Columns, click a 2X
link.
- If the mode is Protein-Protein Comparison Redundant, mark the
check boxes for the proteins you wish to display, then click the button
(at the top of the results) labeled Display Peptides by Protein
SubGroup.
In either case, the table shows which proteins contain each detected
peptide. To limit further the number of accession numbers in the table,
mark the check boxes for the accession numbers you wish to display and
click the Peptide Compare button.
Spectrum Summary
The Spectrum Summary tool was created as a means to sort spectra
according to some measure of spectral quality. One obvious use is to
find novel peptides by process of elimination, i.e. good quality
spectra which remain uninterpreted after all appropriate databases have
been searched. While several spectral features
are available as criteria for sorting, the one which seems to do the
best job of putting high quality spectra to the top of the list is the Maximum
Sequence Tag Length - the longest path through a series of ions
separated by amino acid masses. This is not intended as a de novo
interpretation, but rather a very crude calculation which makes no
attempt to consider the various possible fragment ion types nor choose
which of the possible paths is actually correct. Note that high scores
by this measure will represent spectra which fragment at each
consecutive amino acid along the peptide backbone (most likely doubly
charged spectra in electrospray MS/MS).
Spectrum Summary has also become the primary means of reporting results from
Sherenga de novo Sequencing and Spectrum Matcher through its
Data Integration Modes.
Spectrum Summary also allows spectra to be segregated
according to quality, as a means for creating groups of spectra that
can be selectively subjected to interpretation by MS/MS Search or
Sherenga de novo Sequencing. See the validation state section for further
details.
The Spectrum Viewer is a
convenient tool for reviewing results.
To Use the Spectrum Summary Form
The following topics describe options available on the Spectrum
Summary form.
Summarize Results for Review
- Summarize - Click to summarize results. Click this
button after you have set all parameters. This button also saves
your Spectrum Summary settings so that they are retained as you
navigate to other Spectrum Mill pages during your current web browser
session. Once you click the Summarize button, the button is
disabled until the results appear. If you need to re-enable the button,
click the Summary Settings button at the top of the page to
reload the Spectrum Summary form.
- Save As - Click to save current Spectrum Summary settings in a parameter file.
- Load - Click to load a parameter
file that contains summary settings. For default values, select a parameter file from
the Defaults folder. The
parameter files for Spectrum Summary are there to help with the page
settings, but they cannot be used in a workflow.
- Excel Export - Mark to export
results to Excel or to upload to LIMS. For the latter,
first make sure your system administrator has configured the upload.
See Exporting to Excel or Uploading to LIMS.
- Spectrum Files - Modify this list if you want to process
only a subset of the files in the data directory. Wildcards (*)
are supported. To see the names of your spectrum files, look in
the cpick_in subdirectory under the directory where you placed
your raw files.
Sorting
- Sort by: Determines how the spectra are sorted in the results summary
Data Directory
Spectral Quality Filtering
Certain Spectral Features calculated by the SM Data Extractor and can be used
with multiple downstream SM modules to craft a smaller subset of high value spectra.
For more details see Spectral Quality Filtering.
Filter by: Use this to filter by one additional feature.
See Spectral Features.
Spectral Type/Status Filtering
- Fragmentation mode - choose the mode from the drop-down list.
- Spectrum validation filter: Use this to filter and list only the spectra having a particular validation setting.
See Peptide Validation.
- Validation preset: Used during spectral review and manual validation, and determines whether spectra are initially classified
as good-spectrum, bad-spectrum, reset, or none. Select good-spectrum
if you set the filter in this section to select spectra with relatively
high probability of being good. Otherwise, set to bad-spectrum
and then change to good-spectrum when you find good spectra as
you manually review the spectra. The validation preset
classifications are not yet a permanent part of the data record and can
easily be changed as data are reviewed.
Data Integration Modes
- DB search Result - Reports not only core features of database search results
(score, sequence, sequence map, accession_number, backbone_cleavage_score, fragmentation category),
but also sequence coverage metrics (recall, num covered AAs, #cuts - N,C,I).
- de novo Result Sherenga - Reports features of the Sherengade novo results. These include:
(score, the vertex score string - for each peptide backbone bond cleavage, the original
top scoring sequence from Sherenga, sequence tag representations of the top scoring result that replaces
low confidence AA's with mass - using vertex score thresholds of 0 and 2, sequence coverage metrics
including recall and accuracy relative to the
DB search result based on the thresholded sequence tag representation of the top scoring result).
When Excel Export output is generated and R is installed on the SM server, plots are generated for the recall and accuracy performance of SM DB search, Sherenga, and PEAKS/Novor.
- de novo Result PEAKS/Novor
- For integration with results derived from PEAKS using the same dataset the following file must
be present in a subdirectory of the selected SM data Directory: cpick_in/all de novo candidates.csv
- For integration with results derived from Novor using the same dataset the following files must
be present in a subdirectory of the selected SM data Directory: cpick_in/*.mgf.csv, where * corresponds to the prefixes of the *.RAW files processed in Spectrum Mill.
Reports features of the de novo results.
For PEAKS these include: (average local confidence score - ALC, minimum LC score - MLC, the local confidence score
string - for each AA, the original top scoring sequence from PEAKS, sequence tag representations of the top scoring result that replaces
low confidence AA's with mass - using an LC threshold of 60 and 80, sequence coverage metrics including recall and accuracy relative to the
DB search result based on the thresholded sequence tag representation of the top scoring result).
For Novor, similar metrics to PEAKS are reported. Where appropriate, differences are accounted for: aaScore instead of LC score,
aaScore thresholds of 25, 30, 35.
When Excel Export output is generated and R is installed on the SM server, plots are generated for the recall and accuracy performance of SM DB search, Sherenga, and PEAKS/Novor.
- Spectrum Matcher Result required -
SpectralFeatures
- Longest sequence tag - Amino acid sequence corresponding
to maximum sequence tag length
- Precursor charge - Charge state of precursor ion
- Fragmentation mode - Fragmentation mode used to acquire the spectrum
- Precursor MH+ - Measured precursor ion MH+
- m/z - Measured m/z of the precursor ion, as determined by Data Extractor
- Acquired precursor m/z - Measured m/z of the
precursor ion, as determined by the mass spectrometer software.
This value may actually be a 13C isotope, which is why it
may differ from Precursor m/z.
- Collision energy - Available only for certain Applied Biosystems/MDS Sciex data
- RT - Retention time associated with each spectrum
- # b/y pairs - Number of b/y pairs represented in the spectrum
- Glyco Product Ions Score - Based on The 9 ion glycosylation-signature set: 126,138,144,168,186,204,274,292,366.
Numerically, GPIS is a 2-part score. See CPIS & GPIS for more detail.
- Ion mobility - reports drift time (DT) and
collision cross-section (CCS) values, if present. If CCS values are not calculated, a value of 0.0 is
reported.
- MS precursor EIC intensity - Peak intensity calculated
for extracted ion chromatogram of each peptide precursor. See the
totalIntensity topic under Spectral
Features.
- MS L/H EIC intensity - Displays intensities of
all parallel light/heavy EICs calculated during data extraction. See
SILAC and Other Differential Expression
Quantitation. Since you typically use the Spectrum Summary
page to display spectra that have not been interpreted, you do not see
the light/heavy ratios calculated in the results table, nor should you
attempt to calculate them from these data. Instead, use the
calculations from the Protein/Peptide Summary page. The values are
reported as 0’s for “metabolic” modifications, such as SILAC and 14N/15N-mixes.
- Reporter ion intensity - Displays the reporter ion fragment intensities for iTRAQ and TMT experiments
- MS/MS TIC intensity - After peak detection, the total intensity of all peaks in the MS/MS spectrum
- # peaks Detected - Number of peaks remaining after the MS/MS Search peak detection is applied
- # peaks Centroid - Number of peaks after centroiding
- Profile - Number of profile peaks (Applied Biosystems/MDS Sciex data only)
- Noise Mean - Mean noise calculated during
Spectrum Mill data extraction. See Peak
Detection.
- Std dev - Noise standard deviation calculated during Spectrum Mill data extraction. See Peak Detection.
- Base peak intensity - After peak detection, the intensity of the most intense peak in the MS/MS spectrum
- Base peak / TIC ratio - Base peak intensity / MS/MS TIC intensity
SILAC and Other Differential Expression Quantitation
The Spectrum Mill supports precursor ion intensity based quantitation with a wide
range of labels that are used for differential expression quantitation
(DEQ). A number of labels are pre-programmed in the software, but
you can
add your own modifications
and use them for quantitation. At installation, the software
supports many common modifications,
including:
- SILAC 2 (Arg 0-6Da, Lys 0-8Da)-mix
- SILAC 3 (Arg 0-6-10Da)-mix
- N-terminal propionyl-D0, propionyl-D5, and
propionyl-mix
- C-terminal methyl ester-D0, methyl ester-D3,
and methyl ester-mix (also modifies D and E)
- C-terminal 16O/18O
- ICAT (D0/D8)
- Cleavable ICAT (12C/13C)
The discussion in this section applies to the above modifications.
The following modifications are also supported, but the software
handles them differently:
If you have labels that exhibit small mass differences between the
light and the heavy versions (~4 Da), see also Quantitation for labels with small mass
differences.
For the isotopic labels other than iTRAQ,
TMT and 14N/15N,
regardless of whether the DEQ modification is pre-programmed or added
later, the following requirements must be met:
- The instrument must have a Spectrum Mill Data Extractor program
that reads the instrument vendor's data file directly.
- The data file must be from a data-dependent analysis that
acquired both MS and MS/MS spectra.
This section describes how to display the results, how the
light/heavy ratios are calculated for each peptide, and how the peptide
ratios are combined to calculate a ratio for the corresponding
protein. In this section, the term "SILAC" refers
generically to reagents that are used for differential expression
quantitation based on precursor ion intensity.
Displaying Results for SILAC and other Isotopic Labels
On the Protein/Peptide Summary page:
- Under Review Fields, mark the check box for DEQ ratios
(differential expression quantitation ratios).
- If you wish to display the light/heavy pairs together, set Sort
peptides by to Sequence.
Calculating Light/Heavy Ratios for Each Peptide
The Spectrum Mill allows a SILAC ratio to be calculated
even if only one member of a heavy, light pair has been subjected to
MS/MS.
As described in the Spectral Features
section, for each precursor mass subjected to MS/MS, Data Extractor
calculates an EIC (extracted ion chromatogram) in the intervening MS
scans of an LC-MS/MS run, resulting in a chromatographic peak area for
the precursor mass.
In each Spectrum Mill data directory in a file called SpecFeatures.tsv
these peak areas are stored in the column called totalIntensity. When you review
database search results in Protein/Peptide Summary, these peak areas
are retrieved for display.
When Data Extractor is run and the modification is set to one of the
-mix varieties, Data Extractor calculates a parallel EIC in the
intervening MS scans, depending on the m/z shift associated
with the SILAC label, to yield a chromatographic peak area for the other
member of the SILAC pair. Actually, multiple parallel EIC's are
calculated for each precursor mass because at the time of running Data
Extractor, the MS/MS spectrum has not yet been interpreted, so it is
not known whether the precursor subjected to MS/MS was from a
label-containing peptide at all, from a light or heavy labeled peptide,
nor how many labeled residues are present in the peptide. Furthermore,
on low resolution instruments, the precursor charge may not yet be
known; thus the m/z shift is uncertain as well. Since Data
Extractor will calculate and store all the possibilities,
Protein/Peptide Summary can later retrieve the appropriate one after
interpretation has been completed.
Consequently, the SILAC ratio for a particular peptide is the result
of the EIC for the selected precursor mass and the result of the
appropriate parallel EIC associated with the mass shift of the SILAC
label. This means that a ratio can be calculated when only one member
of a pair has been subjected to MS/MS.
In the cases where both members of an SILAC pair have been subjected
to MS/MS, the ratio shown for the two members will most likely be close
but not identical. That is because the parallel EIC calculations are
performed in the time domain based upon the particular precursor
selected for MS/MS. The fact that the two labels (if K0 and K8)
may not quite co-elute or the chromatographic peak detection of the
MS/MS-triggering precursors may have different sensitivity
accounts for the difference between
the two calculations. The time tolerance (+/- seconds) set in Data
Extractor should allow for the difference in retention times. You will
not see this discrepancy in the protein mode, provided that
both the K8- and K0-labeled precursor ions were
subjected to MS/MS and that these results were of sufficient quality to
be interpreted and included in the final results summary. When the
peptide ratios are combined to calculate a ratio for the protein, the
ratio for the pair is recalculated directly using only the EICs of each
precursor, not the parallel EICs obtained using the calculated m/z
shift from the precursor.
Calculating a Light/Heavy Ratio for the Corresponding Protein
After the interpreted spectra for peptides have been grouped
together because they correspond to a single protein, a SILAC ratio for
the protein is calculated by approximately taking the median of the
values for the PSMs. The median, standard deviation and number of
values contributing to the median are reported in the Protein modes in
Protein/ Peptide Summary.
Some details associated with error and redundancy in the calculation
of the median are described here.
- Since the ratios of lesser abundant proteins will have poorer ion
statistics, the standard deviation on the ratios will be larger and
thus the ratios less trustworthy. Hence it is valuable to report
standard deviations as well as ratios.
- Poorer ion statistics may occur even when counting ratios from
peptides toward the median for a particular protein. Some examples are
peptides derived from non-specific or missed cleavages and partially
oxidized methionines, or any peptide that ionizes poorly.
- If multiple precursor charge states for a particular peptide are
measured, all charge states contribute.
Filtering out PSMs with poor quality ratios
In Protein/Peptide Summary modes that incorporate protein level information have
Protein Quantitation options relevant to precursor ion-based quantitation including:
- Exclude poor isotope quality Precursor XIC's: < 0.70 Chi2 vs. Averagine -
- Exclude outlier DEQ Ratios (> 2 std dev from mean) -
Why are some ratios negative?
In Peptide and PSM level reports, some ratios (not log2 transformed) may be listed as negative.
This is done to indicate that the ratio was designated as not meeting a quality control threshold.
Nonetheless, the magnitude is provided and represents the actual ratio of the measured intensities to allow one
override the quality control designation. The primary source of this negative designation is when the
averagine Chi2 ratio of the partner precursor ion to the one selected for MS/MS was poor quality.
See the p/i/q/p code in the table below.
When the parallel EICs to the selected precursor described above are being calculated in the Data Extractor,
an averagine Chi2 ratio for each is calculated, but not exported to the specFeatures.1.tsv file
(because there are many of these for each MS/MS spectrum). Instead, a
hardcoded threshold of xx is applied and if the value is below it, the EIC intensity is simply marked as negative
when written to the SpecFeatures file.
Any ratio containing a negative intensity value can be excluded from
from contributing to median protein and VM-site level ratios. To override/use this behavior
open the file millscripts/lsmDEQ.pl and toggle the variable near the top of the file
$UNDO_QUALITY_CONTROLLED_LH_RATIO_NEGATION. 2/27/2019 Karl needs to check, 0 means exclude, 1 means do not exclude.
Karl should give give some guidance here....
When ratios are not calculated
If the Data Extractor cannot determine a charge for a peptide (the
extracted file ends in 0.pkl), it assumes a charge of +2 for
determining the mass shifts for quantitation, and it looks for up to
two modification sites in the peptide (e.g., two cysteines at
most). When the actual charge is not +2, or when there are more than
two modification sites in the peptide, the ratio is not calculated, and
is reported as n/c.
Ratios are also reported as n/c when the peptide does not
contain the amino acid that reacts with the labeling reagent.
The following codes in PSM/Peptide level reports may be present to indicate why a ratio was not reported:
| Code |
Meaning |
| n/c |
Not calculated (see above) |
| d/d/z |
Do not divide by zero (the denominator was zero) |
| o/e |
Outlier excluded |
| r/e |
Replicate excluded- the precursor ions of both the numerator and denominator labels are present as PSMs.
Only the ratio for one of those PSMs is reported and counted toward the protein or VM-site level quantitation,
the other PSM is designated as r/e |
| p/i/q |
The averagine Chi2 ratio of the precursor selected for MS/MS was poor quality |
| p/i/q/p |
The averagine Chi2 ratio of the partner precursor ion to the one selected for MS/MS was poor quality |
In Protein Summaries, the Single Label (L,M,H Only) column is new with B.04.01.
A single label protein will have all peptide ratios <= 0, which indicates that
all of the peptides for the protein had ratios which were found to be one of the codes in the above table.
Quantitation for iTRAQ
and TMT
The Spectrum Mill supports quantitation with iTRAQ
and TMT labels.
The iTRAQ (isobaric tag for relative and absolute quantitation)
reagents modify the N-terminus and K, and they allow simultaneous
quantitation of up to eight different cell states based on low-mass
MS/MS signature ions. The processing and quantitation for
iTRAQ-modified peptides is different from that described under
SILAC and Other Differential Expression
Quantitation.
The Spectrum Mill supports iTRAQ and TMT
quantitation for Agilent Q-TOF
and
ion trap data, generic peak list data (requires
the generic Data Extractor), and Thermo Fisher Scientific LCQ and LTQ
*.raw data (requires the Thermo Fisher Scientific Data Extractor and
requires that during extraction, the software merges MS2 and
MS3 scans from the same precursor).
Starting with version A.03.03, the Spectrum Mill supports
iTRAQ in two forms:
- iTRAQ, which assumes complete labeling of the N-termini and
lysines, and behaves the same as iTRAQ-mix did in version A.03.02
- iTRAQ Partial-mix, which assumes incomplete labeling and searches
in four cycles:
- No label
- Lysine-only label
- N-terminal-only label
- Complete label (both lysines and N-terminus)
Starting with version B.04.00, the Spectrum
Mill workbench supports iTRAQ4 and iTRAQ8, TMT2 and TMT6:
- iTRAQ4 - select from 4 isobaric tags with
masses 114 to 117
- iTRAQ8 - select from 8 isobaric tags with
masses 113 to 121
- TMT2 - select from 2 isobaric tags with
masses 126 to 127
- TMT6 - select from 6 isobaric tags
with masses 126 to 131
Starting with version B.05.00, TMT10 quantification is supported.
- TMT10 - select from 10 isobaric tags
Data Extractor
The iTRAQ and TMT intensity
calculations do not require extracted ion
chromatograms from the MS data. The abundances of the iTRAQ and TMT masses are calculated
from the MS/MS data. This is significantly
different behavior than for the SILAC-like modifications.
MS/MS Search
With the isotopic labels used for differential expression
quantitation, if you select one of the variations that ends in mix,
each spectrum is searched multiple times—once for each possible label.
The results are merged as a single output. For iTRAQ or TMT, only a single
search is necessary. Since the
tags are
isobaric, all versions of the iTRAQ or TMT
reagent are simultaneously fragmented during
MS/MS. Further, all iTRAQ and TMT
labels produce the same MS/MS fragments
for a given parent peptide. Therefore, the iTRAQ
or TMT
labels do not have to
be searched as a mix. However,
each set of tags produces different
reporter ions in
its
mass range,
and the abundances of these reporter ions are used by
the Spectrum Mill for relative quantitation.
Protein/Peptide Summary
To display iTRAQ and TMT results using the Protein/Peptide Summary
page:
- Under Review Fields, mark
the intensities check box next to the
iTRAQ/TMT selection list.
- From the iTRAQ/TMT selection list, select either
iTRAQ4,
iTRAQ8,
TMT2 or
TMT6.
- Mark the check box for Ratios control, and select
the iTRAQ or TMT
mass you wish to use in
the denominator for ratio
calculations.
- If you want to see the iTRAQ or TMT
modification in a report that shows
peptides, mark check boxes for both N-terminus and Modifications,
since the reagents react at both the N-terminus and lysines.
- If you want to export your data to Excel so you can apply the
correction factors that you received in your certificate of analysis
for the iTRAQ reagents, mark the check box for Excel export.
Quantitation for 15N
and 14N/15N mix
Quantitation for the metabolic isotopic labels 15N and 14N/15N
mix is different than for the modifications discussed under
SILAC and Other Differential Expression
Quantitation. For 14N/15N mix, the
quantitation begins at the Protein/Peptide Summary level rather than at
the Data Extractor level. The quantitation is based on finding matching
peptides with the two labels. Both the 14N and the 15N
peptides must have been subjected to MS/MS, and the MS/MS Search
results must indicate the same sequence and charge. 14N/15N
mix and iTRAQ/TMT are the only
modifications where differential expression
quantitation can begin with the generic Data Extractor. The 14N/15N
calculations assume 100% incorporation of 15N.
Quantitation for labels with
small mass differences
If you are attempting differential expression quantitation with
labels that have relatively small mass differences between the light
and the heavy versions (~4 Da), you need to change the Data Extractor
setting for Merge scans with same precursor m/z from the
default value. Change from the default window of +/-1.4 m/z
to a window of +/-1.0 m/z or lower.
When there are small mass differences between labels, a 2+ peptide
with both versions of such a label will show two isotopic distributions
that are 2-m/z from each other. With the default extractor
window of +/-1.4 m/z, it is likely that when the
software calculates the intensity for a given precursor m/z,
some of the isotopic peaks from the precursor's light or heavy
counterpart will be contained within the m/z window, which will
significantly skew the DEQ results. To avoid errors in the intensity
measurement, reduce the window to +/-1.0 m/z or
even lower.
When you reduce the window, some MS/MS spectra may not merge, so
multiple identifications of the same peptide within the merge time
period may occur. However, this is preferable to inaccurate DEQ results.
Spectrum Matcher
Spectrum Matcher provides a means of matching one set of spectra
against another in a way that is integrated into the Spectrum Mill file
system, thus allowing one to define the sets of spectra according to
directory location and validation state. You can also
use Spectrum Matcher to compare spectra acquired with different acquisition
methods to evaluate any improvements, and to evaluate the quality of spectra
using the spectral quality filters.
Thus Spectrum Matcher is a tool for answering the following types of
questions:
Identity mode - Are any of the spectra in my query set the
same as any in the library set?
Precursor mass shift mode - Are any of the spectra in my
query set related to any in the library set?
When seeking to match related spectra, the most common application is to select the same
directory for both Query Set and Library Set, with the Library Set being those spectra already identified (Validation State: valid)
and the Query Set being unidentified spectra (Validation State: spectrum-not-marked-sequence-not-validated).
Scoring of Matches
The score in Spectrum Matcher is very similar to that in MS/MS
Search. Following peak detection, the Spectrum Matcher algorithm
attempts to match every peak present in a query set MS/MS spectrum to
every peak present in a library set MS/MS spectrum. The scoring system
is based on the following general principles:
- Peak Intensity - If a peak is "real" and explainable,
intensity doesn’t matter. Very intense unexplained peaks suggest a poor
match.
- Precursor mass shift mode - If two spectra are from
similar peptides (one modification or amino acid substitution), then
the fragment ion masses may be shifted by the mass difference between
the precursor masses. In calculating the mass shift, the charge state
of the precursor and fragment ions are taken into account.
Spectrum Matcher has two particular scoring attributes:
- Score
Bonus points for each matched peak. Bonus values are always
one point per peak regardless of peak height.
Penalty points for each unmatched peak. Penalty value is
based on peak height - (peak height / height of tallest peak). For
example, if an unassigned peak is 50% the height of the tallest peak in
the peak-detected spectrum, then its penalty value would be 0.5, while
an unassigned peak that is 10% the height of the tallest peak has a
penalty value of only 0.1. Spectrum Matcher requires a minimum score of
3 to report a match. Using the default value of 10 for Peaks (most
intense 12C), the maximum score would be 10.
- SPI - Scored Peak Intensity
From peaks remaining after peak detection, this is the percentage of
total intensity in the query set spectrum that is matched to peaks in
the library spectrum. Scored Peak Intensities lower than 50% suggest a
poor match, or presence of non-corresponding fragment ion types in the
query set spectrum. Adjust the value of Minimum matched peak
intensity to something less than 50% (default value) to enable
reporting of poorer quality matches.
Precursor Mass Shift
Spectrum Matcher compares MS/MS spectra if their precursor masses
fall within the precursor m/z tolerance filter. In Precursor
mass shift mode, this filter is a combination of the Precursor
mass shift and Precursor m/z tolerance. You should
NOT attempt to accomplish this by using a wider precursor m/z
tolerance. Use a Precursor m/z tolerance consistent
with the accuracy to which the precursor mass is measured. The default
value for the Precursor mass shift of +/- 81 allows for the
largest possible precursor mass shift associated with a mutation among
the 20 standard amino acids and phosphorylation. The shift can be
set in four different forms, all of which show only homologous matches,
thus excluding identity mode matches:
- +/- (wide range) - allows matching of a query spectrum to all
library spectra spanning the range of the Precursor mass shift
- =/+/- allows a query spectrum to match a library spectrum only if
the query spectrum's precursor MH+ is shifted either higher
or lower by the specified mass. (The program automatically takes into
account precursor charge.)
- -/= (specified shift down) - allows a query spectrum to match a
library spectrum only if the query spectrum's precursor MH+
is shifted lower by the specified mass. (The program automatically
takes into account precursor charge.)
Note that the +/- will compare many more spectra so it will take
longer to run, and the run time will be proportional to the magnitude
of the Precursor mass shift.
To Use the Spectrum Matcher Form
The following options are available on the Spectrum Matcher
form. For more
details, see Spectrum Matcher.
If during data review you wish to display the Spectrum
Matcher form again, click the Match Settings button at the top
of the page.
Match Spectra
- Match - Click to search one set of spectra against
another. Click this button after you have set all
parameters. This button also saves your Spectrum Matcher settings
so that they are retained as you navigate to other Spectrum Mill pages
during your current web browser session.
- Save As - Click to save current Spectrum Matcher
settings in a parameter file.
- Load - Click to load a parameter file that contains settings for
Spectrum Matcher. For default values, select a parameter file from the
Defaults folder. The parameter
files for Spectrum Matcher are there to help with the page settings, but
they cannot be used in a workflow.
- Instrument - Select the instrument
used to acquire the data. Unlike in the MS/MS Search form, changing the instrument
selection does not change the Matching Tolerances. The
instrument selection is only used to obtain the peak picking parameters (as
set in E:\SpectrumMill\msparams_mill\instrument.txt).
Search Criteria
The following topics discuss the Search Criteria options.
Search Mode
- Search mode: Select Identity or Precursor
mass shift.
- Precursor mass shift: See Precursor
Mass Shift. This option applies only in Precursor mass
shift mode.
- Mass shift histogram from last search - Click this
button to generate a histogram after you search in
Precursor mass
shift mode. This option applies only in Precursor mass
shift mode.
Matching Tolerances
- Minimum matched peak intensity: See Scoring of Matches.
- Precursor m/z: Set to a value consistent with the
mass accuracy of the instrument. See Mass Tolerances.
- Product m/z: Set to a value consistent with the mass
accuracy of the instrument. Units are the same as
for Precursor m/z. See Mass Tolerances.
Spectral Quality Filtering (instrument-specific peak detection used in Extractor)
Certain Spectral Features calculated by the SM Data Extractor and can be used
with multiple downstream SM modules to craft a smaller subset of high value spectra.
For more details see Spectral Quality Filtering.
MS/MS Peak Detection
(over-ride instrument-specific peak detection for matching)
- Minimum S/N - Minimum signal-to-noise of spectral peaks
retained for searching. See Peak
Detection.
- < Peaks (most intense 12C) - Set maximum
number of peaks you want to use for each search. Extracted peaks will
be the most intense 12C ions.
- Minimum # of peaks: - Restrict
searches based on the minimum number of peaks detected during data
extraction.
Data Sets
There are two key Data Sets concepts when using the Spectrum Matcher
Query Set
- Click the Select ... button to select a data directory of
spectra you wish to search. See Selecting
Data Directories.
- Validation state - Use this to search only the spectra
having a particular validation setting. See Peptide Validation.
- Search result files: Modify this list if you want to
process only a subset of the spectrum files in the data directory.
The wildcard character (*) can be used to include only spectra from particular LC-MS/MS runs, or spectra with particualr precursor charge states.
Library Set
- Click the Select ... button to select a data directory of
library spectra you wish to search against. See Selecting Data Directories.
- Validation state - Use this to search against only spectra
having a particular validation setting. See Peptide Validation.
- Search result files: Modify this list if you want
search against only a subset of the spectrum files in the data directory.
The wildcard character (*) can be used to include only spectra from particular LC-MS/MS runs, or spectra with particualr precursor charge states.
Overview for MS Interactive Processing
From a MALDI-MS experiment that takes less than one minute, one can
measure the peptide mass fingerprint of a particular protein by
spotting a target with an aliquot of the proteolytic digest of the
protein. The technique requires that the peptides detected are all
derived from a single protein (perhaps a mixture of up to three
proteins).
To
search Agilent Q-TOF or TOF .d data, first use MassHunter Qualitative
Analysis with Molecular Feature Extraction (MFE) to create a peak list
of possible peptides, and paste that into the Manual PMF search
page. Or the peak list can be a differentially expressed list
from Mass Profiler Professional. The Spectrum Mill
workbench provides tools to run high-throughput PMF searches, and to
review and summarize the results. The figure below illustrates
the overall process.

MALDI Spectra Preprocessing
MALDI spectra must be supplied as peak list files. Depending on the instrument
type, spectral preprocessing steps (centroiding, charge assignment,
de-isotoping, etc.) may be done either within the instrument data
system or within the Spectrum Mill. Settings in instrument.txt ensure
that preprocessing steps are not duplicated between the two. The
Spectrum Mill then provides tools to run high-throughput PMF
searches, and to review and summarize the results. The figure
below illustrates the overall process.
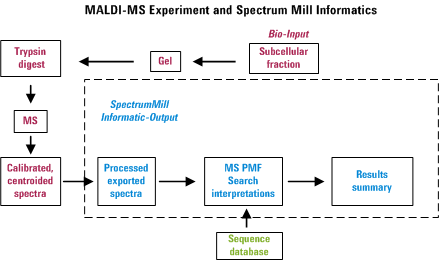
Getting Started for Applied Biosystems MALDI
- Acquire some mass spectra.
- Calibrate and centroid the spectra, then export peak lists using
the instrument data system.
- Transfer the exported spectral files to the Spectrum Mill
computer in a fit_batch_in directory within the
Spectrum
Mill file system.
- From the Spectrum Mill homepage, go to the PMF Search page.
- Set the appropriate parameters and run the searches.
- Review the data from the PMF Search page or the PMF Summary page.
For more details on the PMF Search and PMF
Summary pages, see MS
PMF Search/Summary Help.
To Use the Data Extractor
Form (MS)
The following topics describe options available on the Data
Extractor form. In general, you should retain the default
settings, except for the options highlighted in red text on the
form. For more details, see Spectral
Preprocessing for MS/MS Data. Note that the options change
depending upon the vendor data type to be extracted.
Important note: If you wish to redo a data extraction,
mark the check box for Remove all prior results.
Extraction
- Extract
- Click to
place the task in the queue
for execution. The
program will execute the task to extract spectra from raw data files
based on the time the command entered the queue, its capacity to
process tasks in parallel, and dependencies. Click this button
after
you have either loaded a parameter file or manually set the parameters.
The name of the current parameter file appears in red at the top of the
form. Once you have saved a parameter file, you may start the
extraction from a workflow
rather than manually with the Extract button.
- Save As - Click to save current data
extraction settings in a parameter file.
- Load - Click to load a parameter
file that contains settings for data extraction. For default values, select a
parameter file from the Defaults folder.
- Remove all prior results - Mark this check box to remove
prior extractions, searches and data summaries for this dataset.
- Show only MS (PMF) parameters - Mark this check box to extract
MS-only data, such as from the Agilent TOF. This simplifies the form to
show only the parameters related to MS-only data extraction.
Data Directories
Modifications
MS (PMF) Spectral Features
Note: These options are only available when you mark
the check box Show only MS (PMF) parameters.
- MH+ - Set the mass range to extract.
- Extraction time range: Set the range of scan times you
wish to extract from the raw data files. Use to this to avoid
processing regions of the chromatogram that are not of interest.
Keep the default (1 to 300) to extract all scans.
MS PMF Search/Summary
Peptide mass fingerprinting (PMF) is a very
popular technique for protein identification. The method encompasses
digestion of the protein with site-specific proteases, measurement of
the peptide masses by mass spectrometry (MS), and protein
identification via a database search. The PMF Search capability within
the Spectrum Mill is an advanced, automated database search
program for MS-only spectra.
With PMF Search, the certainty of the
identification is primarily a function of the level of mass accuracy.
The Agilent TOF delivers low-ppm mass accuracy and can be used with
both electrospray and atmospheric pressure MALDI sources, making it an
ideal instrument for confident identifications.
For Agilent TOF and Q-TOF .d data, you must use
MassHunter Qual with MFE to create a peak list to paste into Manual PMF
Search.
After using PMF Search, you can summarize and
review results with the PMF Summary page.
For more details on the PMF Search and Summary pages, see
MS PMF Search/Summary Help.